
Here is how to set up a WooCommerce returns portal: install a returns plugin, run its setup wizard and check the portal page. With the free WPReturns plugin it takes under an hour, and it works for guests and for customers with an account.
This guide follows WPReturns 1.0.0 on our demo store in November 2026, with every setting name checked against the plugin’s Configuration screens. The stakes are real: the NRF 2025 returns report expected 19.3% of online sales to be returned in 2025.
You get seven setup steps with the real screen for each one. Then come guest returns, partial returns, private photos, the admin side and a test plan for launch day.
What a WooCommerce Returns Portal Does
A WooCommerce returns portal turns a return from an email thread into a form with a tracked request behind it. Customers choose items, quantities, a reason and a condition, and they can add photos. Your team approves the request, receives the parcel and refunds it through WooCommerce.
WooCommerce core can refund an order from the admin, as the WooCommerce refunds docs describe. Those docs suggest a policy page that tells customers how to ask, because core has no request form. So without a plugin, every return starts with “what was your order number?” and three more emails.
The volume makes that painful. NRF expected online orders to come back more often than retail sales as a whole:
In the same NRF release, 82% of shoppers called free returns a major consideration when they buy. A returns portal is where shoppers check those terms and act on them without writing to you.
WPReturns adds two front doors to the same request. Logged-in customers get a Returns page in My Account and a return button on each order that qualifies. Guests use the portal page with their order number and billing email.
What You Need Before You Start
You need WordPress 6.5 or newer, WooCommerce 9.0 or newer and PHP 7.4 or newer for WPReturns. The plugin works with HPOS, the block checkout and the classic checkout. Write your return policy down first, because the settings follow it line by line.
Answer three questions before you open the settings. How many days do customers get, and does the clock start at purchase or at delivery? Which products can never come back?
The last question is about proof. Decide which return reasons need a photo before you approve them, such as damaged or wrong item.
If you already run another returns plugin, note that too. After setup you can migrate your old return requests from 10 other plugins.
How to Set Up a WooCommerce Returns Portal
This is how to set up a WooCommerce returns portal with the free WPReturns plugin and its short setup wizard. After the wizard, check the portal page, the return window, the reasons and the policy notices. Then link the portal page from your menu.
Step 1: Install the Free WPReturns Plugin
WooCommerce must be active first. Go to Plugins > Add New, search for WPReturns and click Install Now and Activate. The free WPReturns plugin download works too.
Activation creates two pages for you. One is the Returns page at the slug returns, which holds the guest portal. The other is “Withdraw from contract” for the EU withdrawal form.
1Plugins > Installed Plugins

The demo store also runs Pro, which is why two rows show. The free plugin alone is enough for every step in this guide.
Step 2: Run the Setup Wizard
The setup wizard opens on first activation and takes about three minutes. In the free plugin it has five steps: Welcome, Returns, Refunds, EU withdrawal and Ready.
The Returns step holds the three settings that matter most. “Customer requests” turns the customer side on. “Days to request a return” starts at 30, and “Count days from” starts at “Order completed (delivered)”.
2WPReturns setup wizard > Your return policy
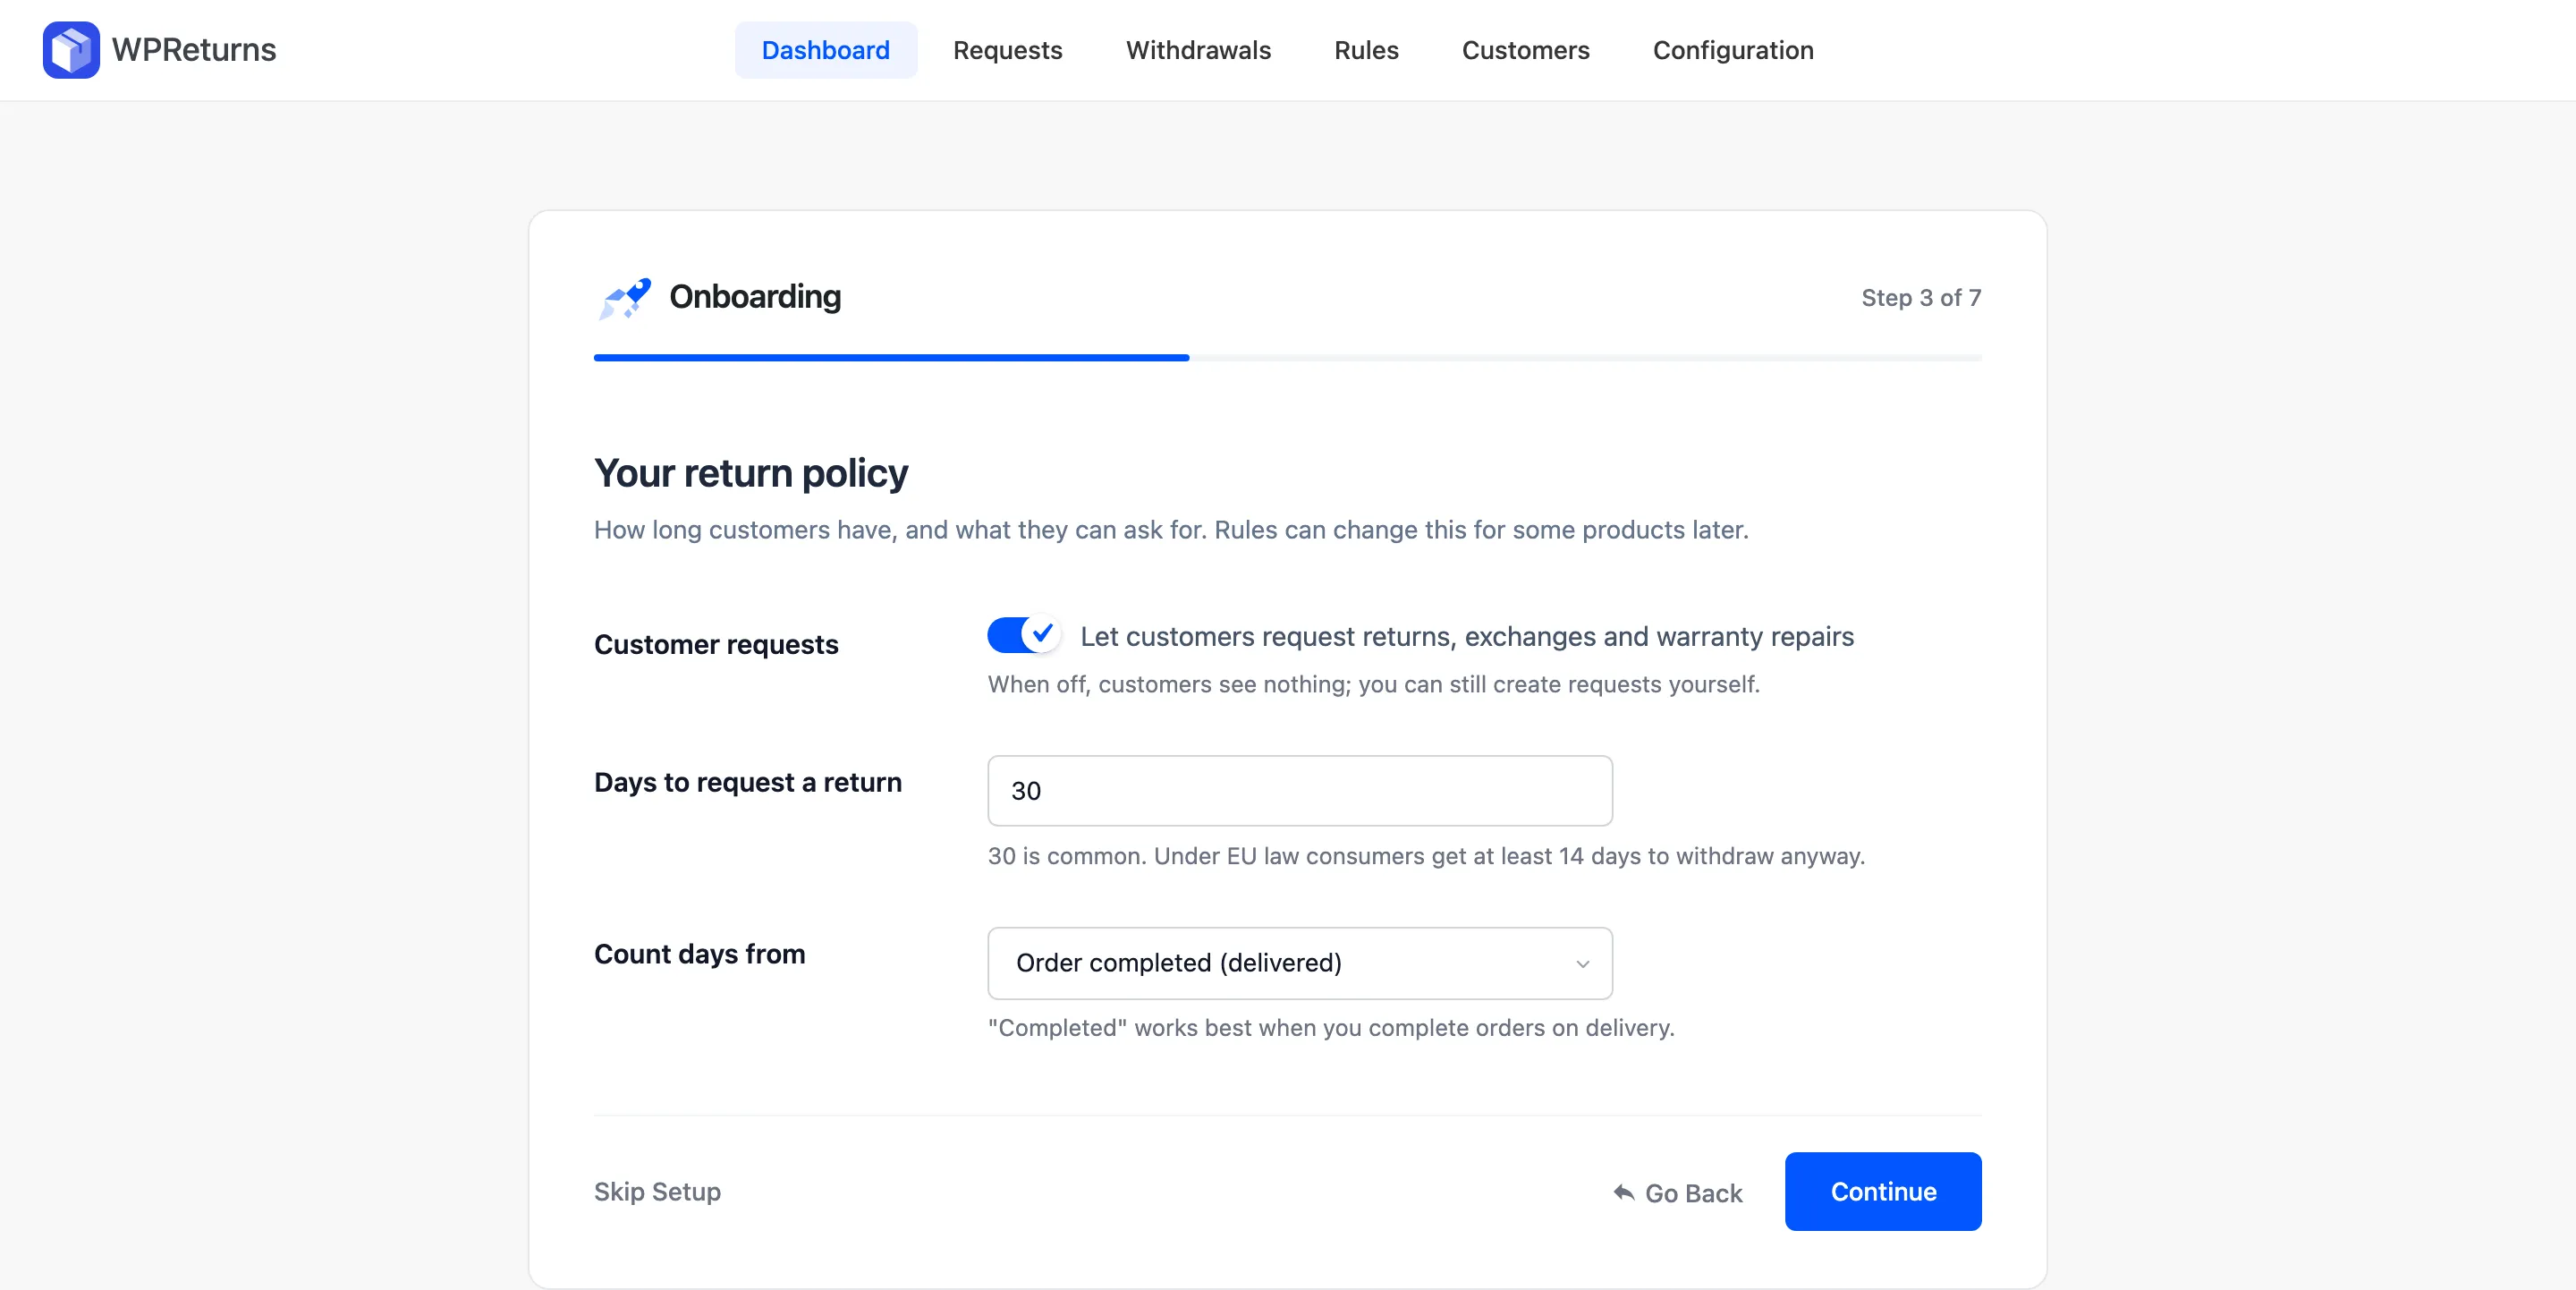
Pro adds License, Resolutions and Shipping steps for seven in all.
Skip the wizard if you like. Every answer sits under Configuration later. The setup wizard docs list each field.
Step 3: Check the Portal Page and Order Statuses
Open DevDiggers Plugins > WPReturns > Configuration > General. Check that “Customer requests” is on and that “Orders that can be returned” lists Completed, the default.
Under “Where customers make requests”, the “My Account endpoint” is returns and the “My Account menu label” is Returns. The “Guest returns portal page” field should point to the Returns page from step 1.
3WPReturns > Configuration > General
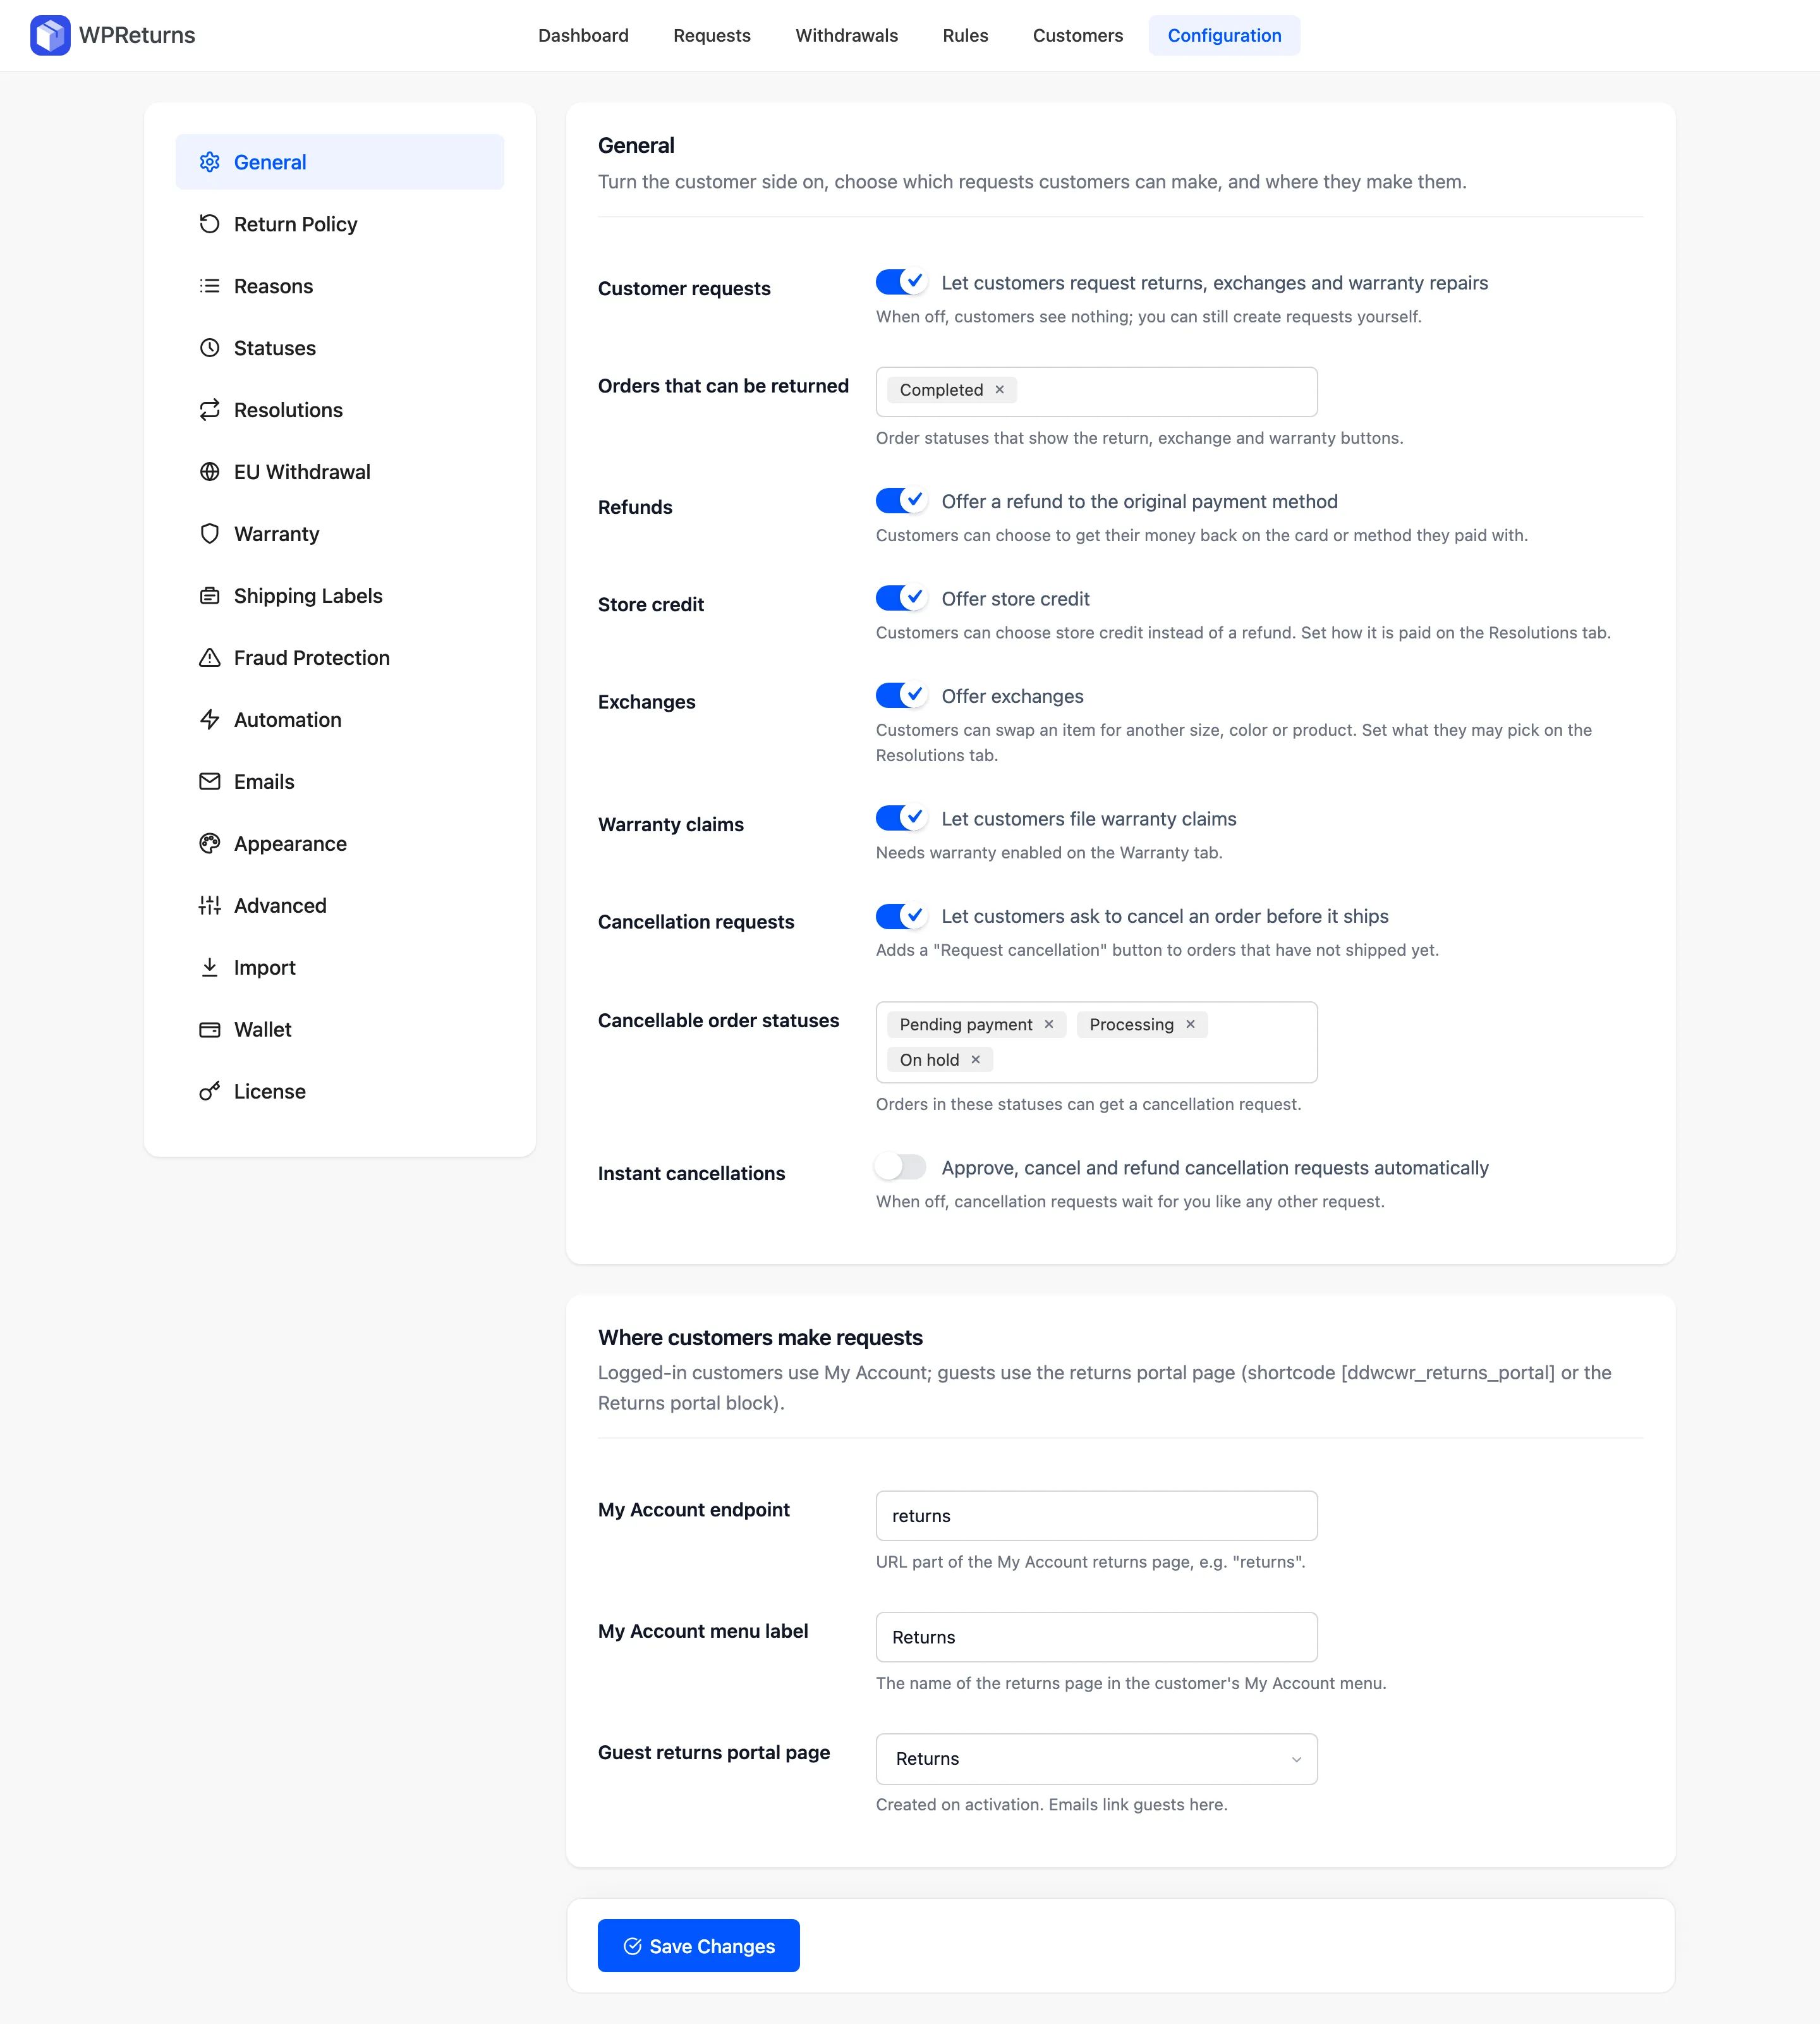
Add Processing to the order statuses only if you ship the same day. Otherwise customers can ask to return parcels that have not left your warehouse.
Step 4: Set the Return Window and Final-Sale Items
Open the Return Policy tab. “Days to request a return” and “Count days from” set the return window WooCommerce customers see on every order. The default is 30 days from the completed date.
“Final-sale categories” takes any category that can never be returned. Single products have their own “Final sale” box on the product’s General tab.
4WPReturns > Configuration > Return Policy
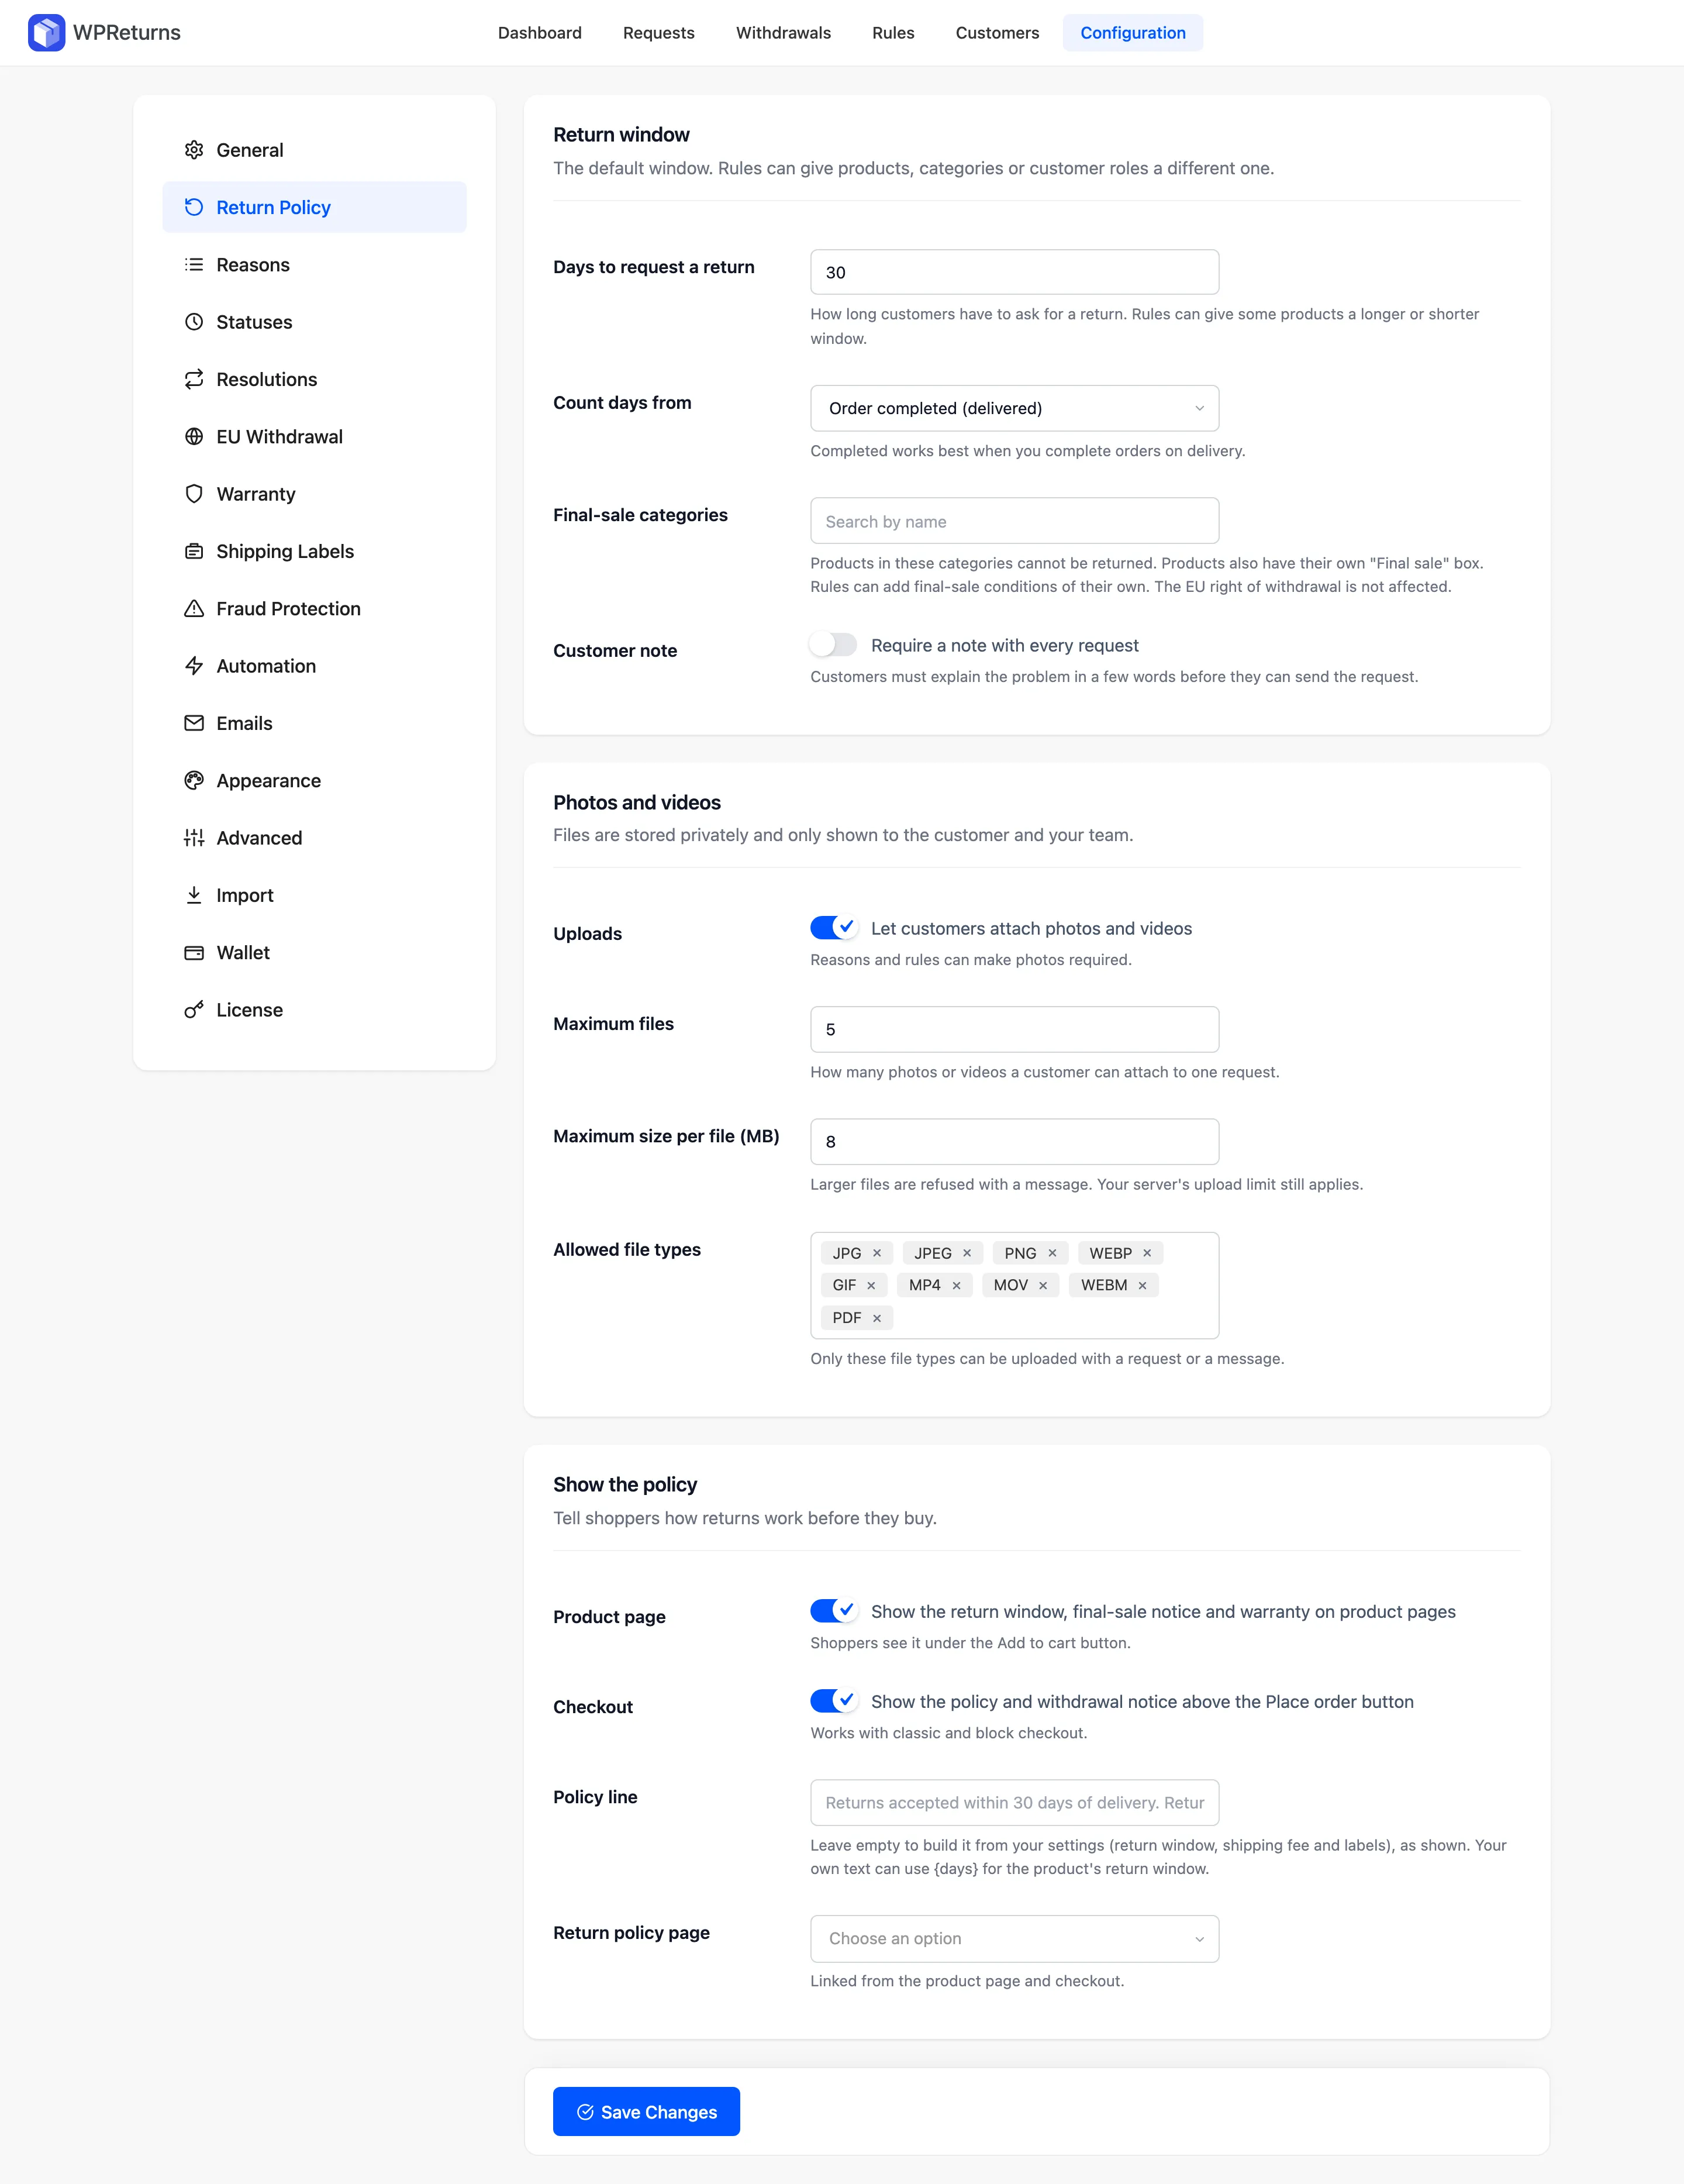
Counting from completion works best when you mark orders Completed on delivery. If you complete them at shipping, the window starts before the customer has the box. In that case add a few days to the number you advertise.
Worth checking: EU consumers can cancel an online purchase within 14 days of delivery under the EU right of withdrawal. Your final-sale list does not remove that right. Only legal exceptions such as made-to-order or unsealed software do, which is why WPReturns keeps withdrawals on their own form.
Step 5: Review Return Reasons and Photo Rules
Open the Reasons tab. WPReturns ships with eight reasons, from “Wrong size or fit” to “Other”, and customers pick one for each item.
Four reasons come with “Photo required” already on: Not as described, Arrived damaged, Defective or stopped working and Wrong item sent. Leave it off for Changed my mind, where a photo adds work and no information.
5WPReturns > Configuration > Reasons
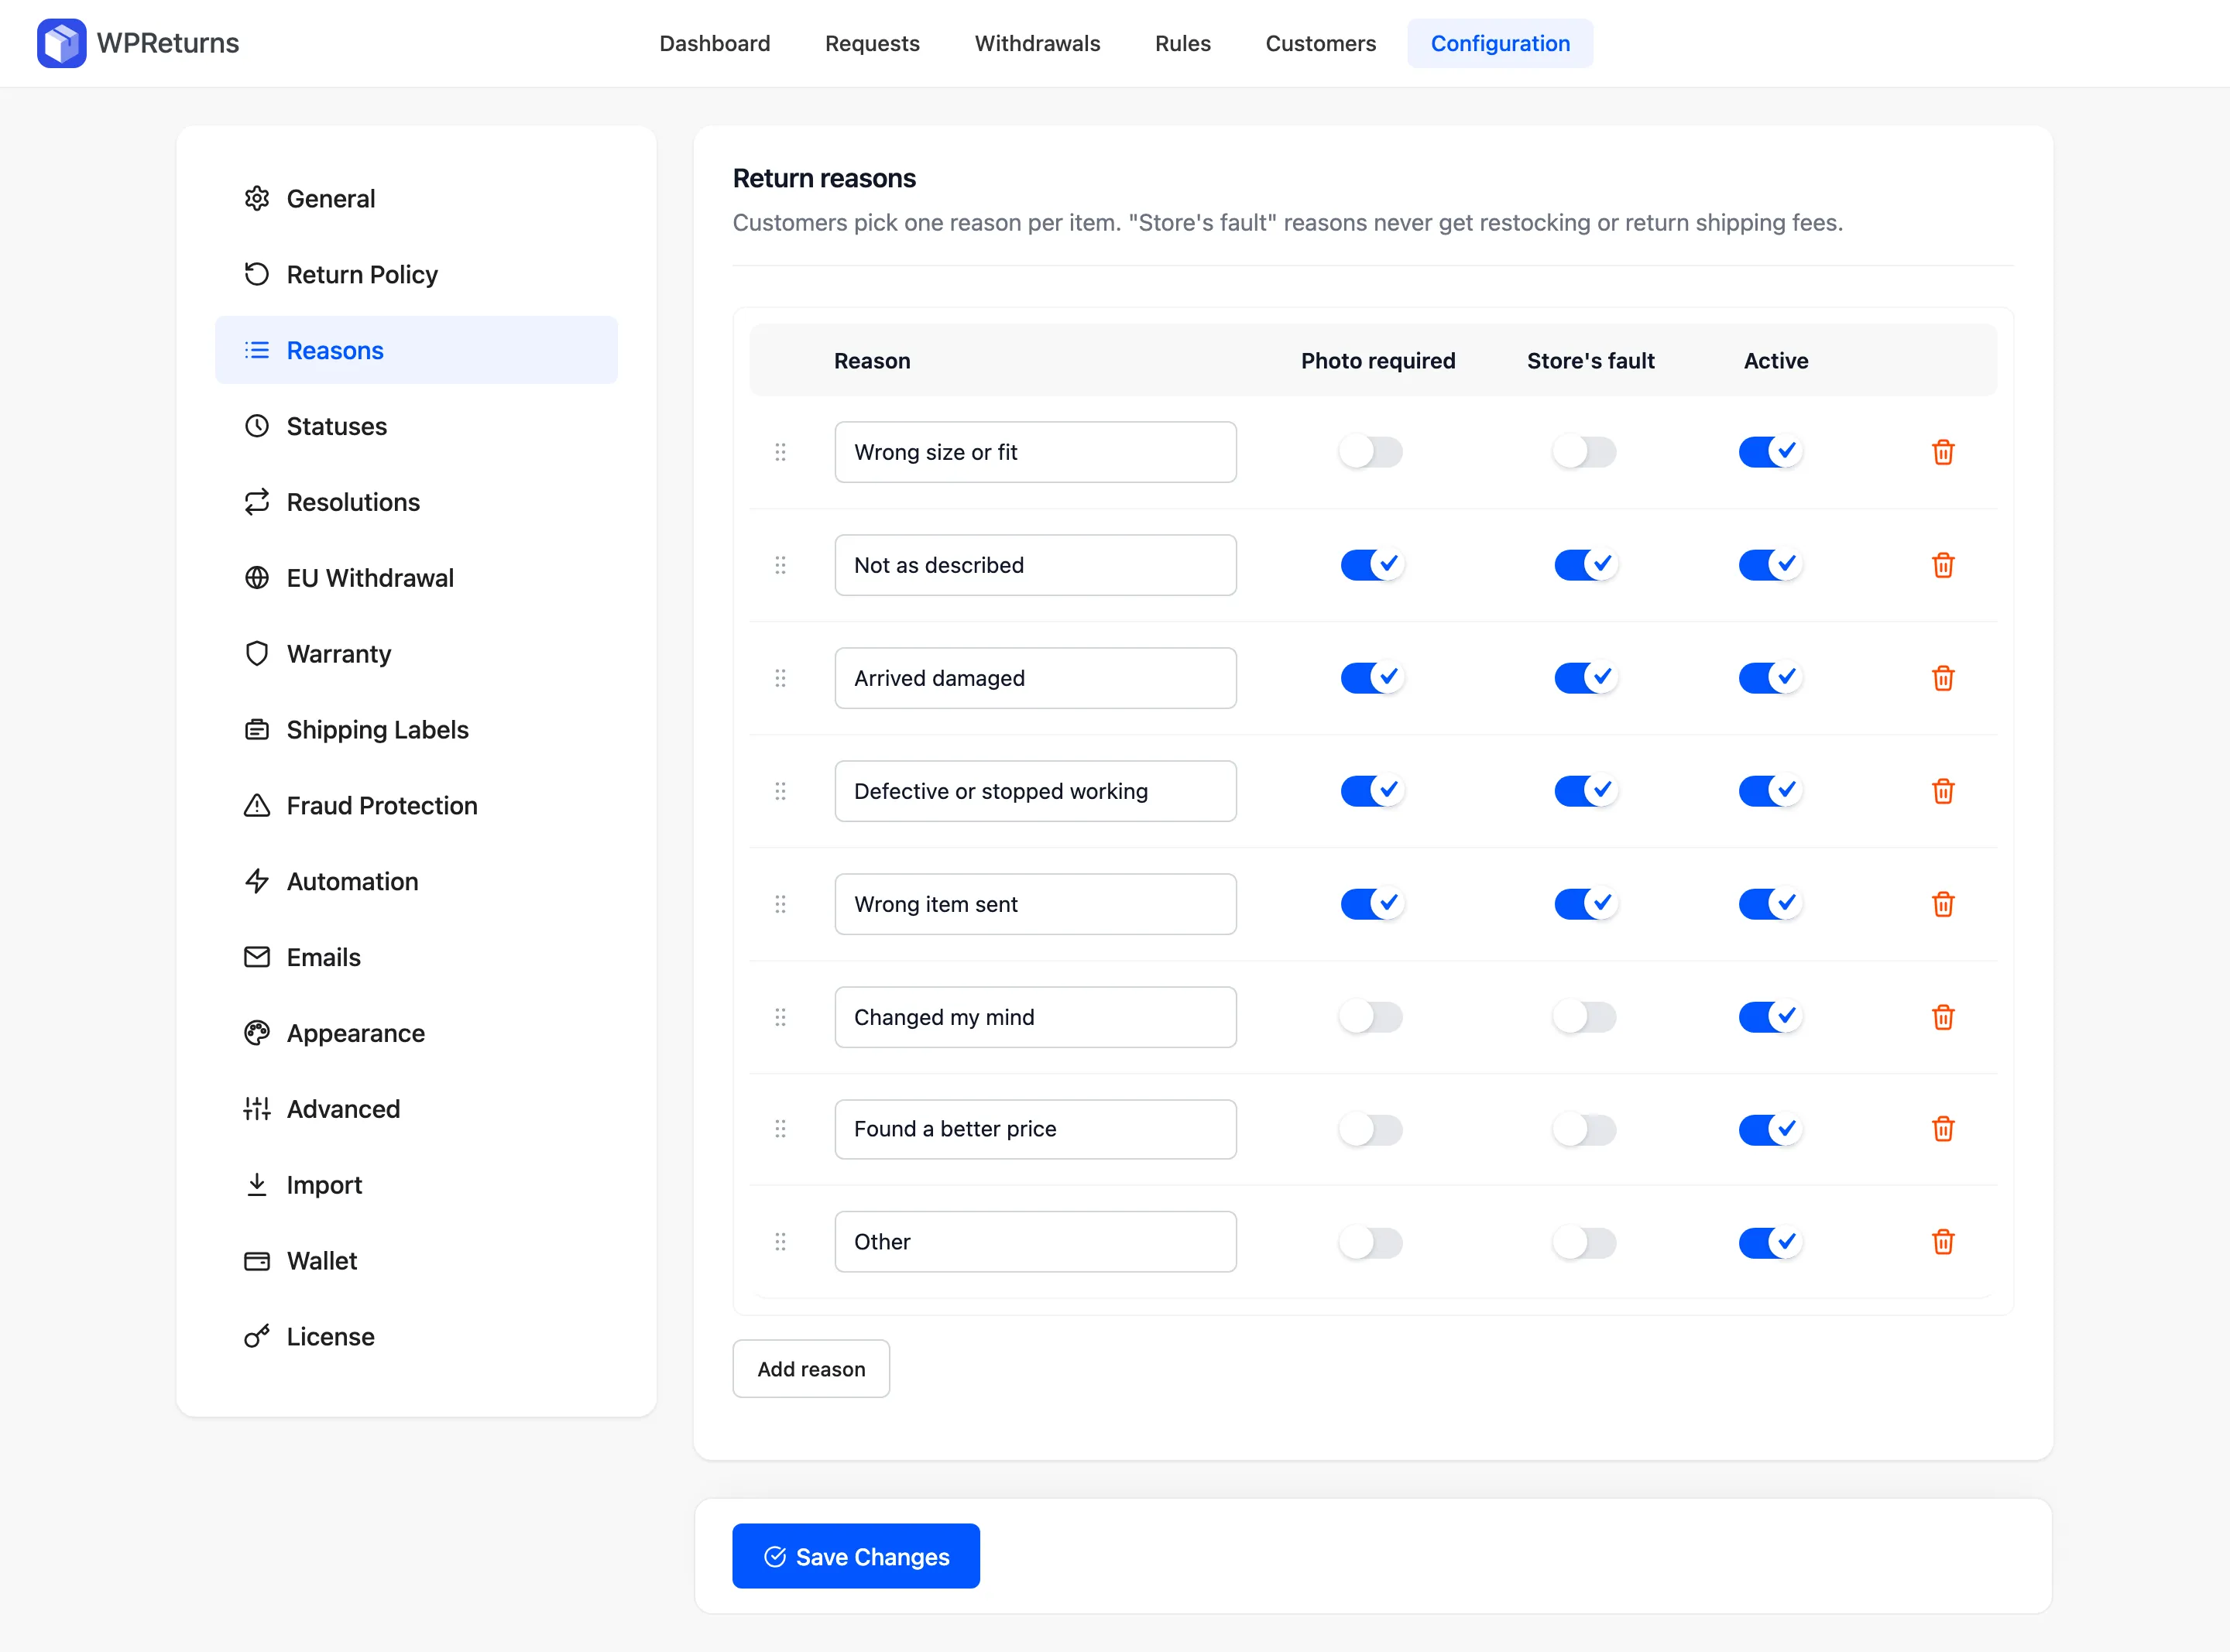
Rename a reason to match your policy wording, or untick Active to hide one without breaking old requests. The Store’s fault column belongs to Pro, where it waives return fees for that reason.
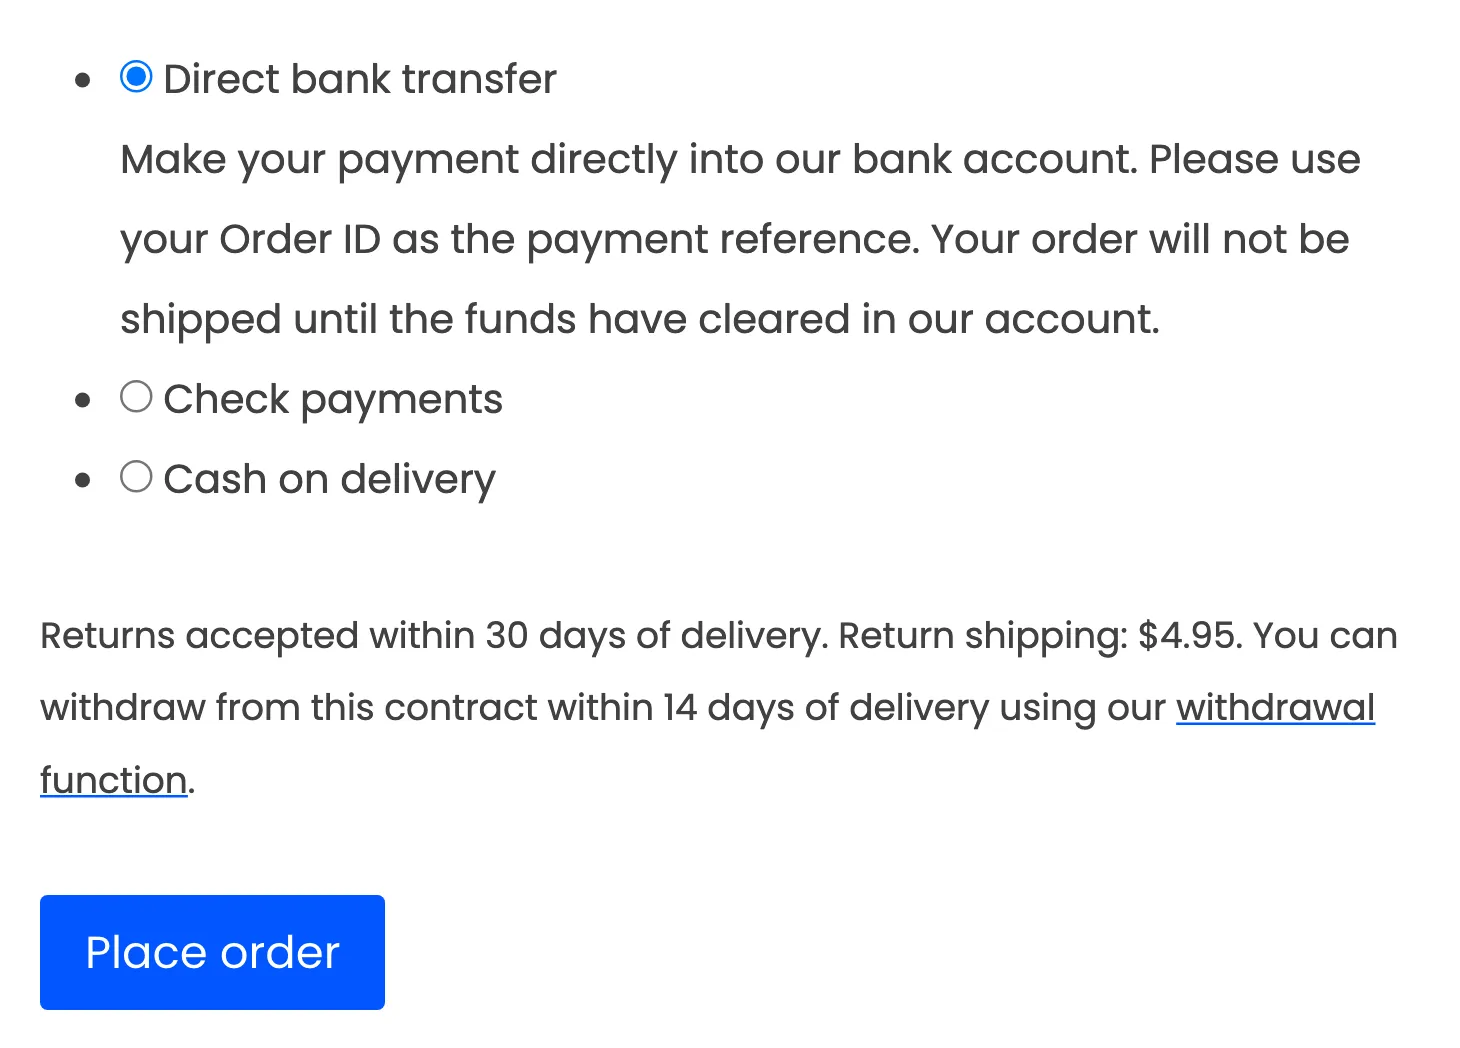
Step 6: Show the Policy on Product Pages and Checkout
Scroll to “Show the policy” on the Return Policy tab. “Product page” shows the return window or a final-sale notice under Add to cart, and “Checkout” shows the policy above the Place order button.
A final-sale product warns shoppers before they buy. The free plugin’s default line reads “Final sale: this item cannot be returned.” On our demo store a Pro rule writes its own message on vinyl records.
6Product page
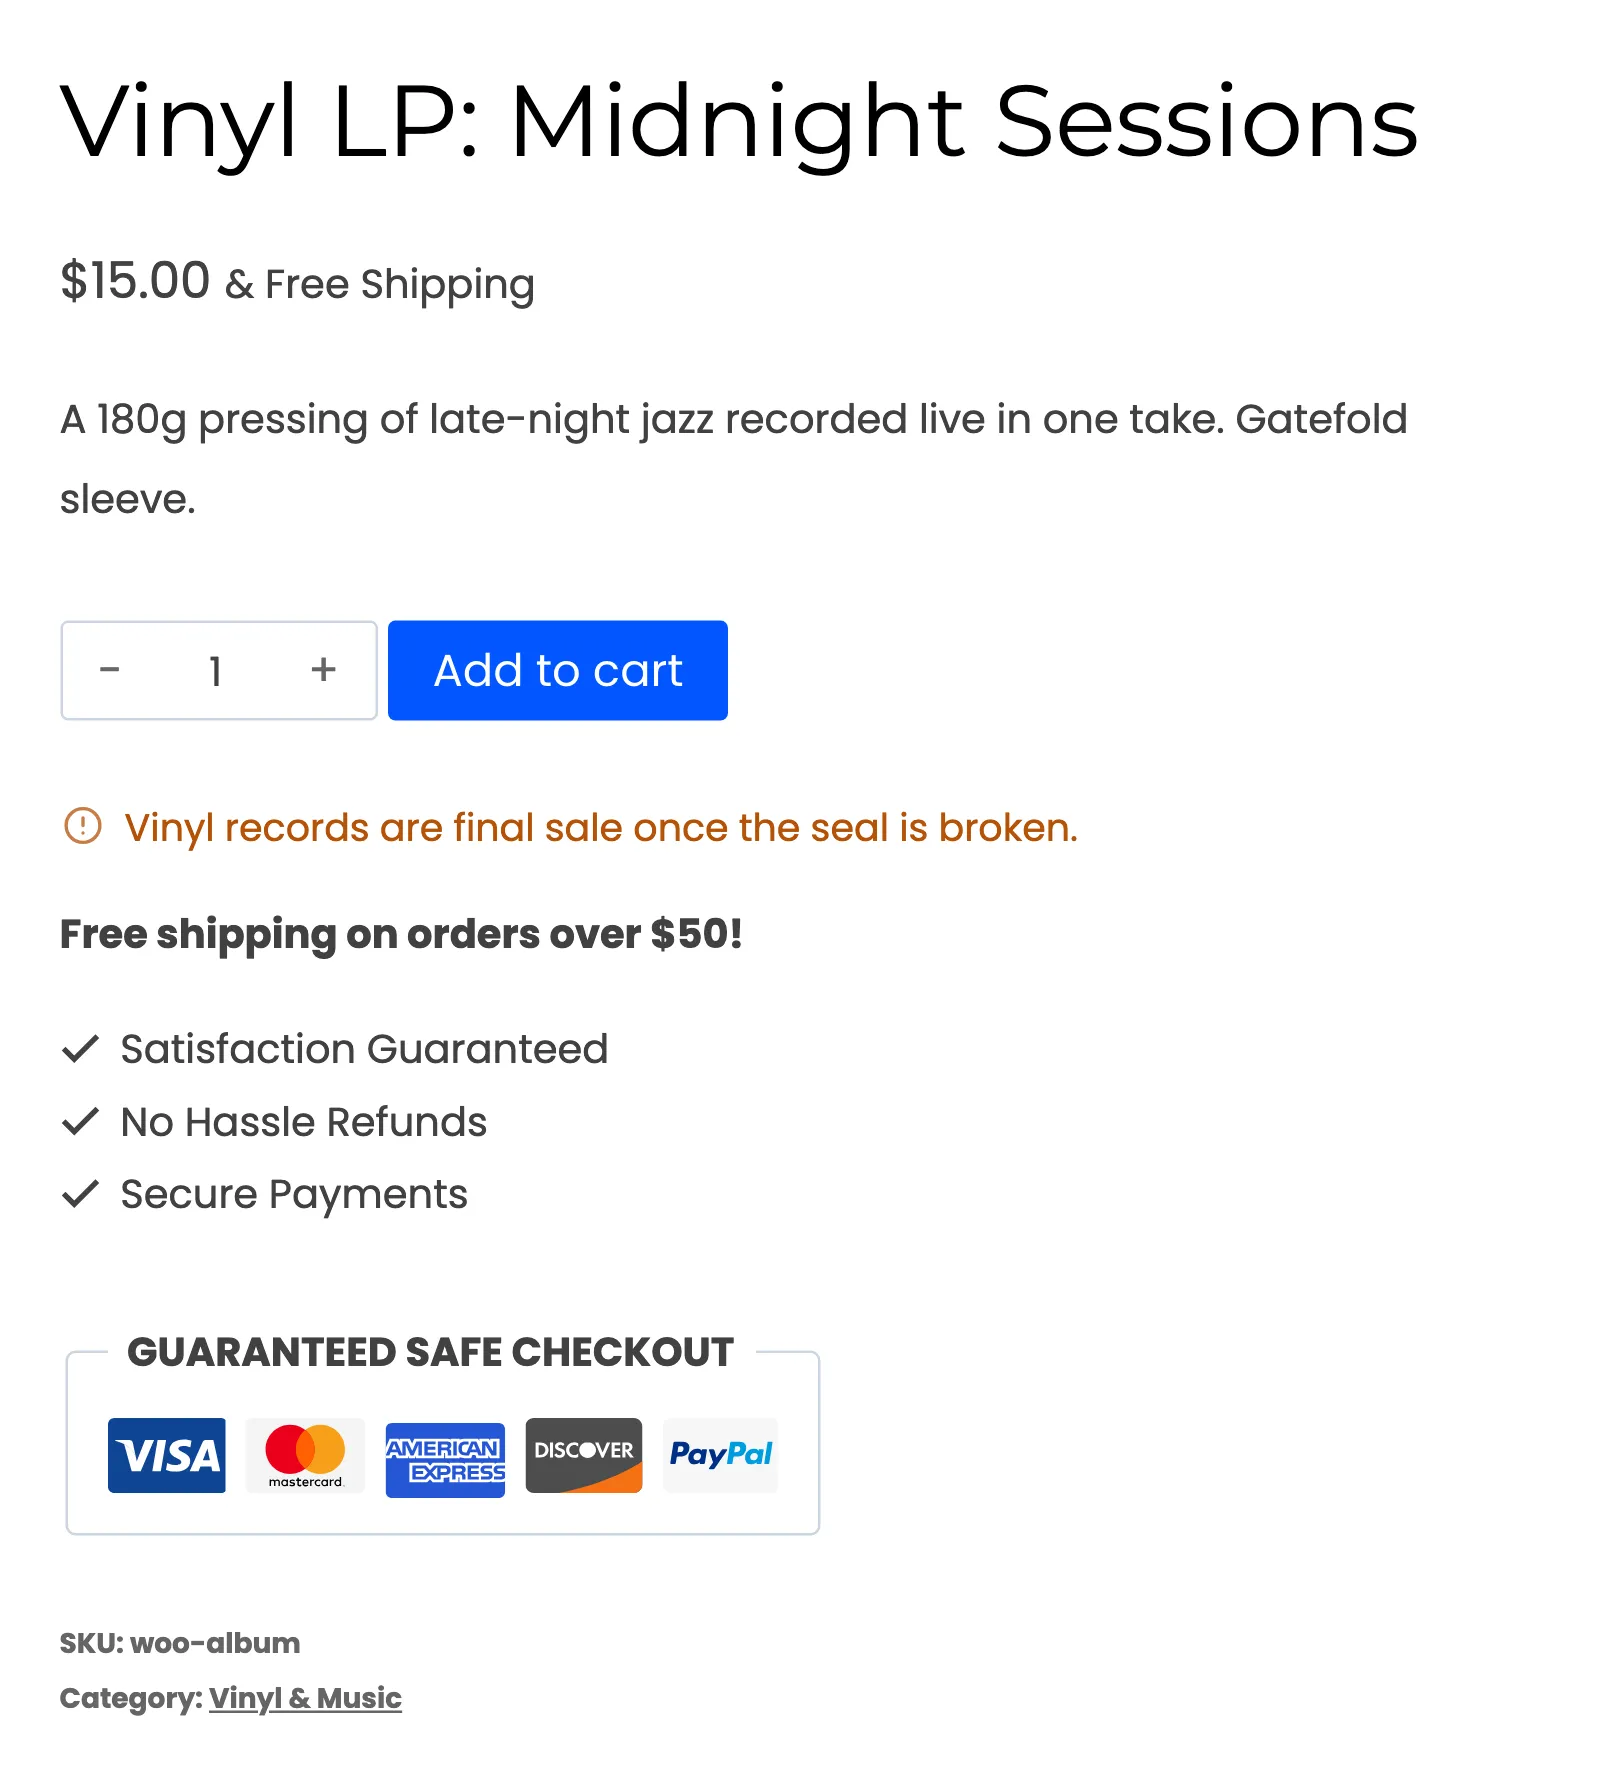
Leave “Policy line” empty and the plugin builds the checkout text from your settings. It works in the classic and the block checkout.
6Checkout
Step 7: Link the Portal From Your Menu and Emails
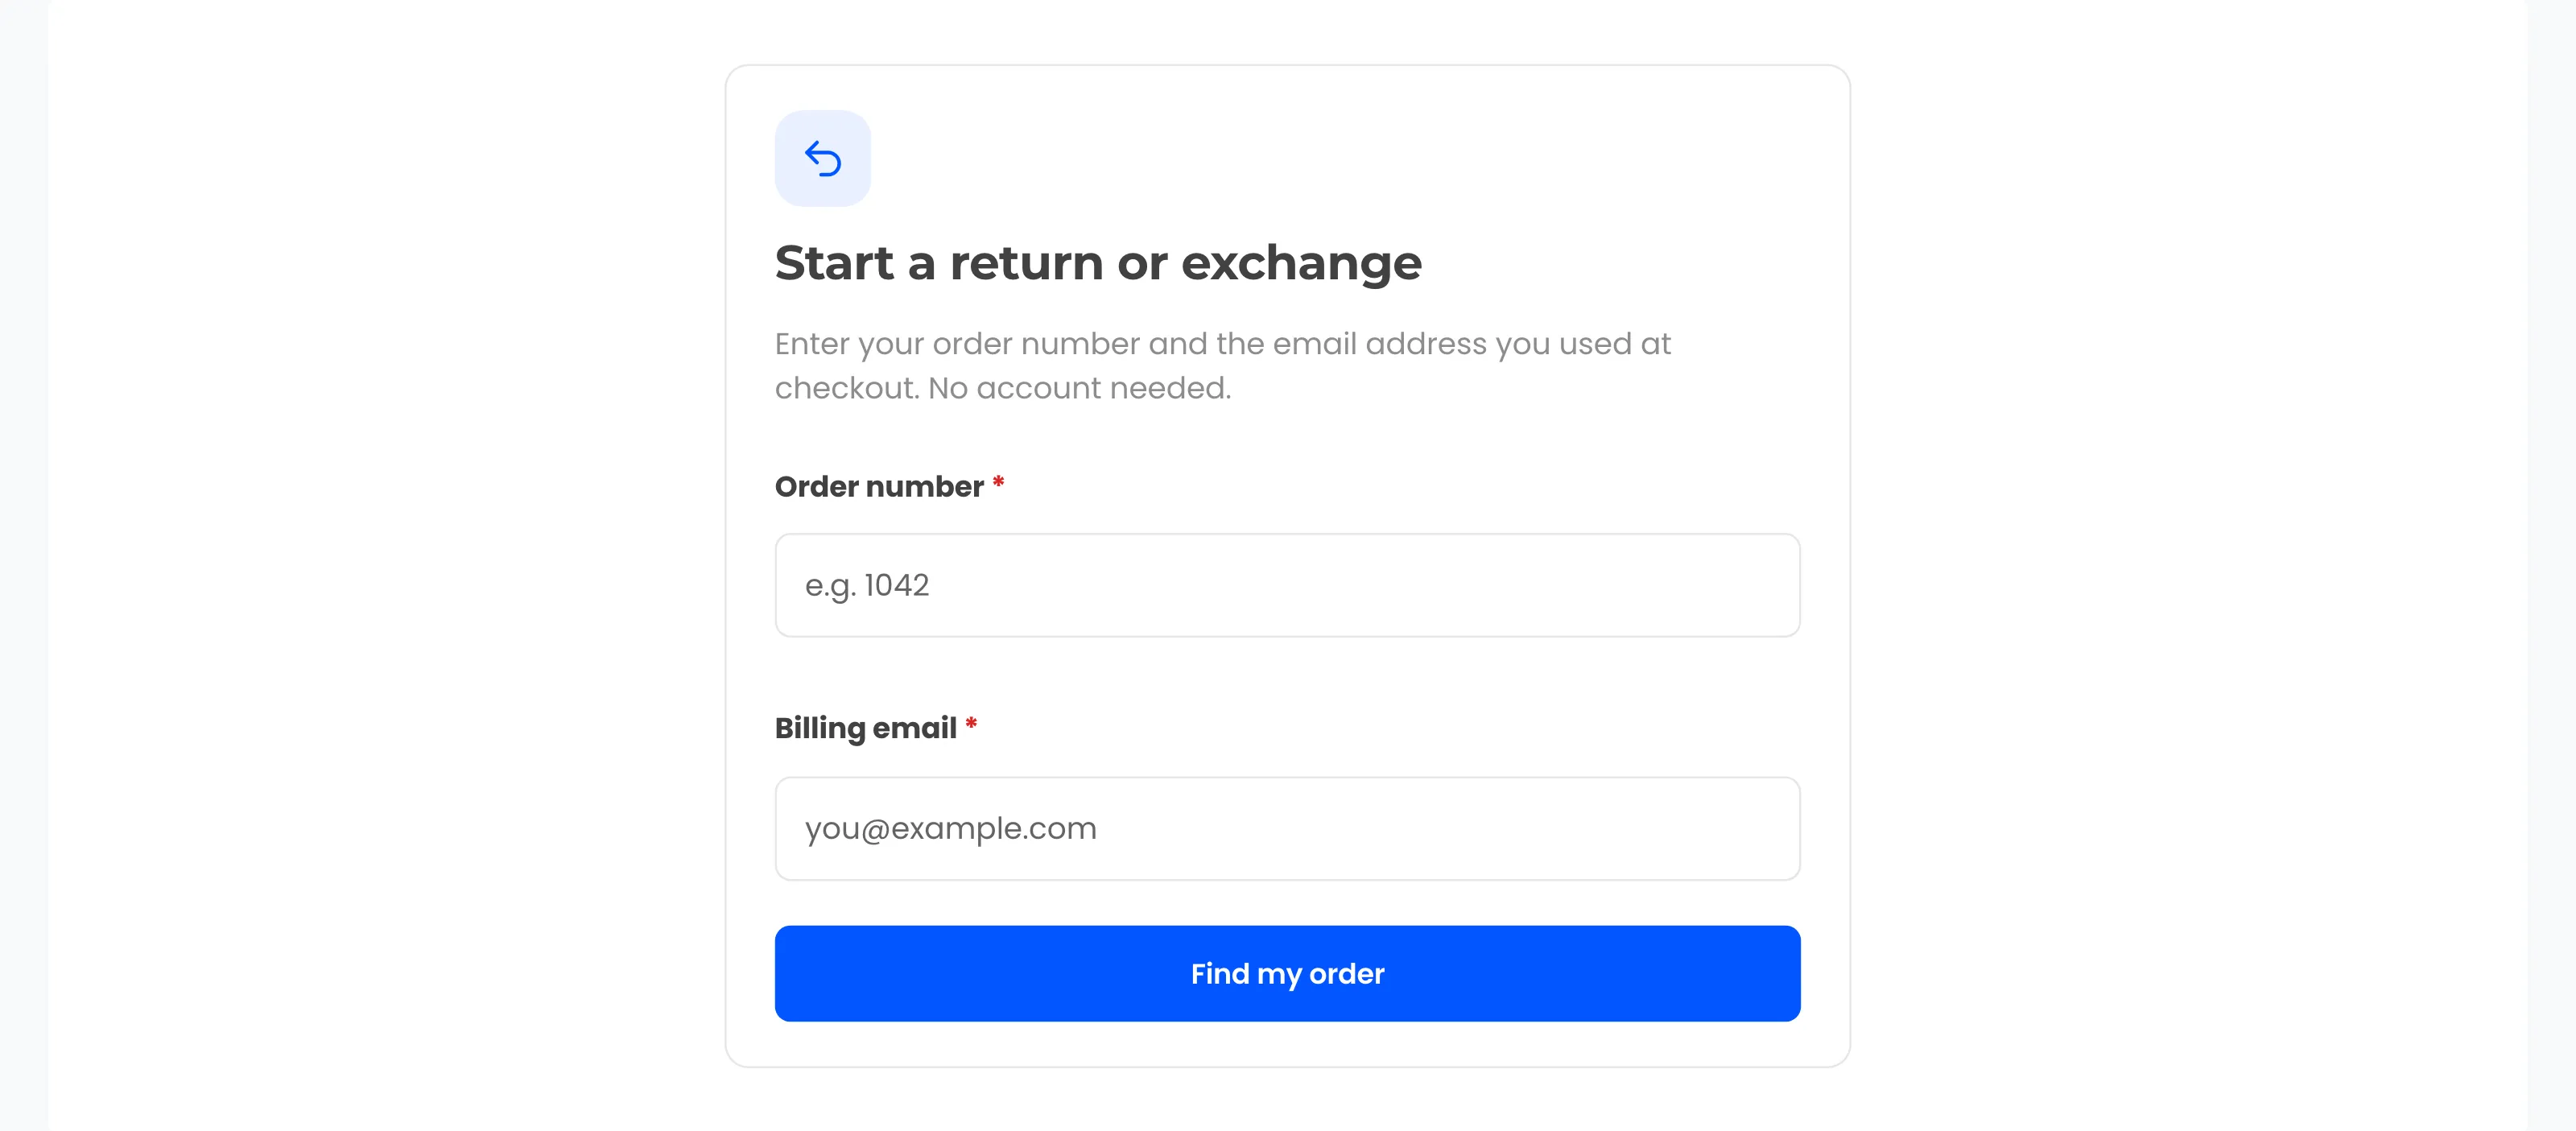
Add the Returns page to your header or footer menu, and link it from your return policy page. Order emails already link guests to the page in “Guest returns portal page”.
The page shows “Start a return or exchange” with Order number, Billing email and a Find my order button. On a free install without exchanges the heading reads “Start a return”.
7yourstore.com/returns
Building this by hand means an order lookup, item picking, uploads, emails and a tracking page. Each part also has to stay safe for guests who never log in.
You can download the free plugin and skip that build. The returns portal feature page shows every screen it adds.
How WooCommerce Guest Returns Work
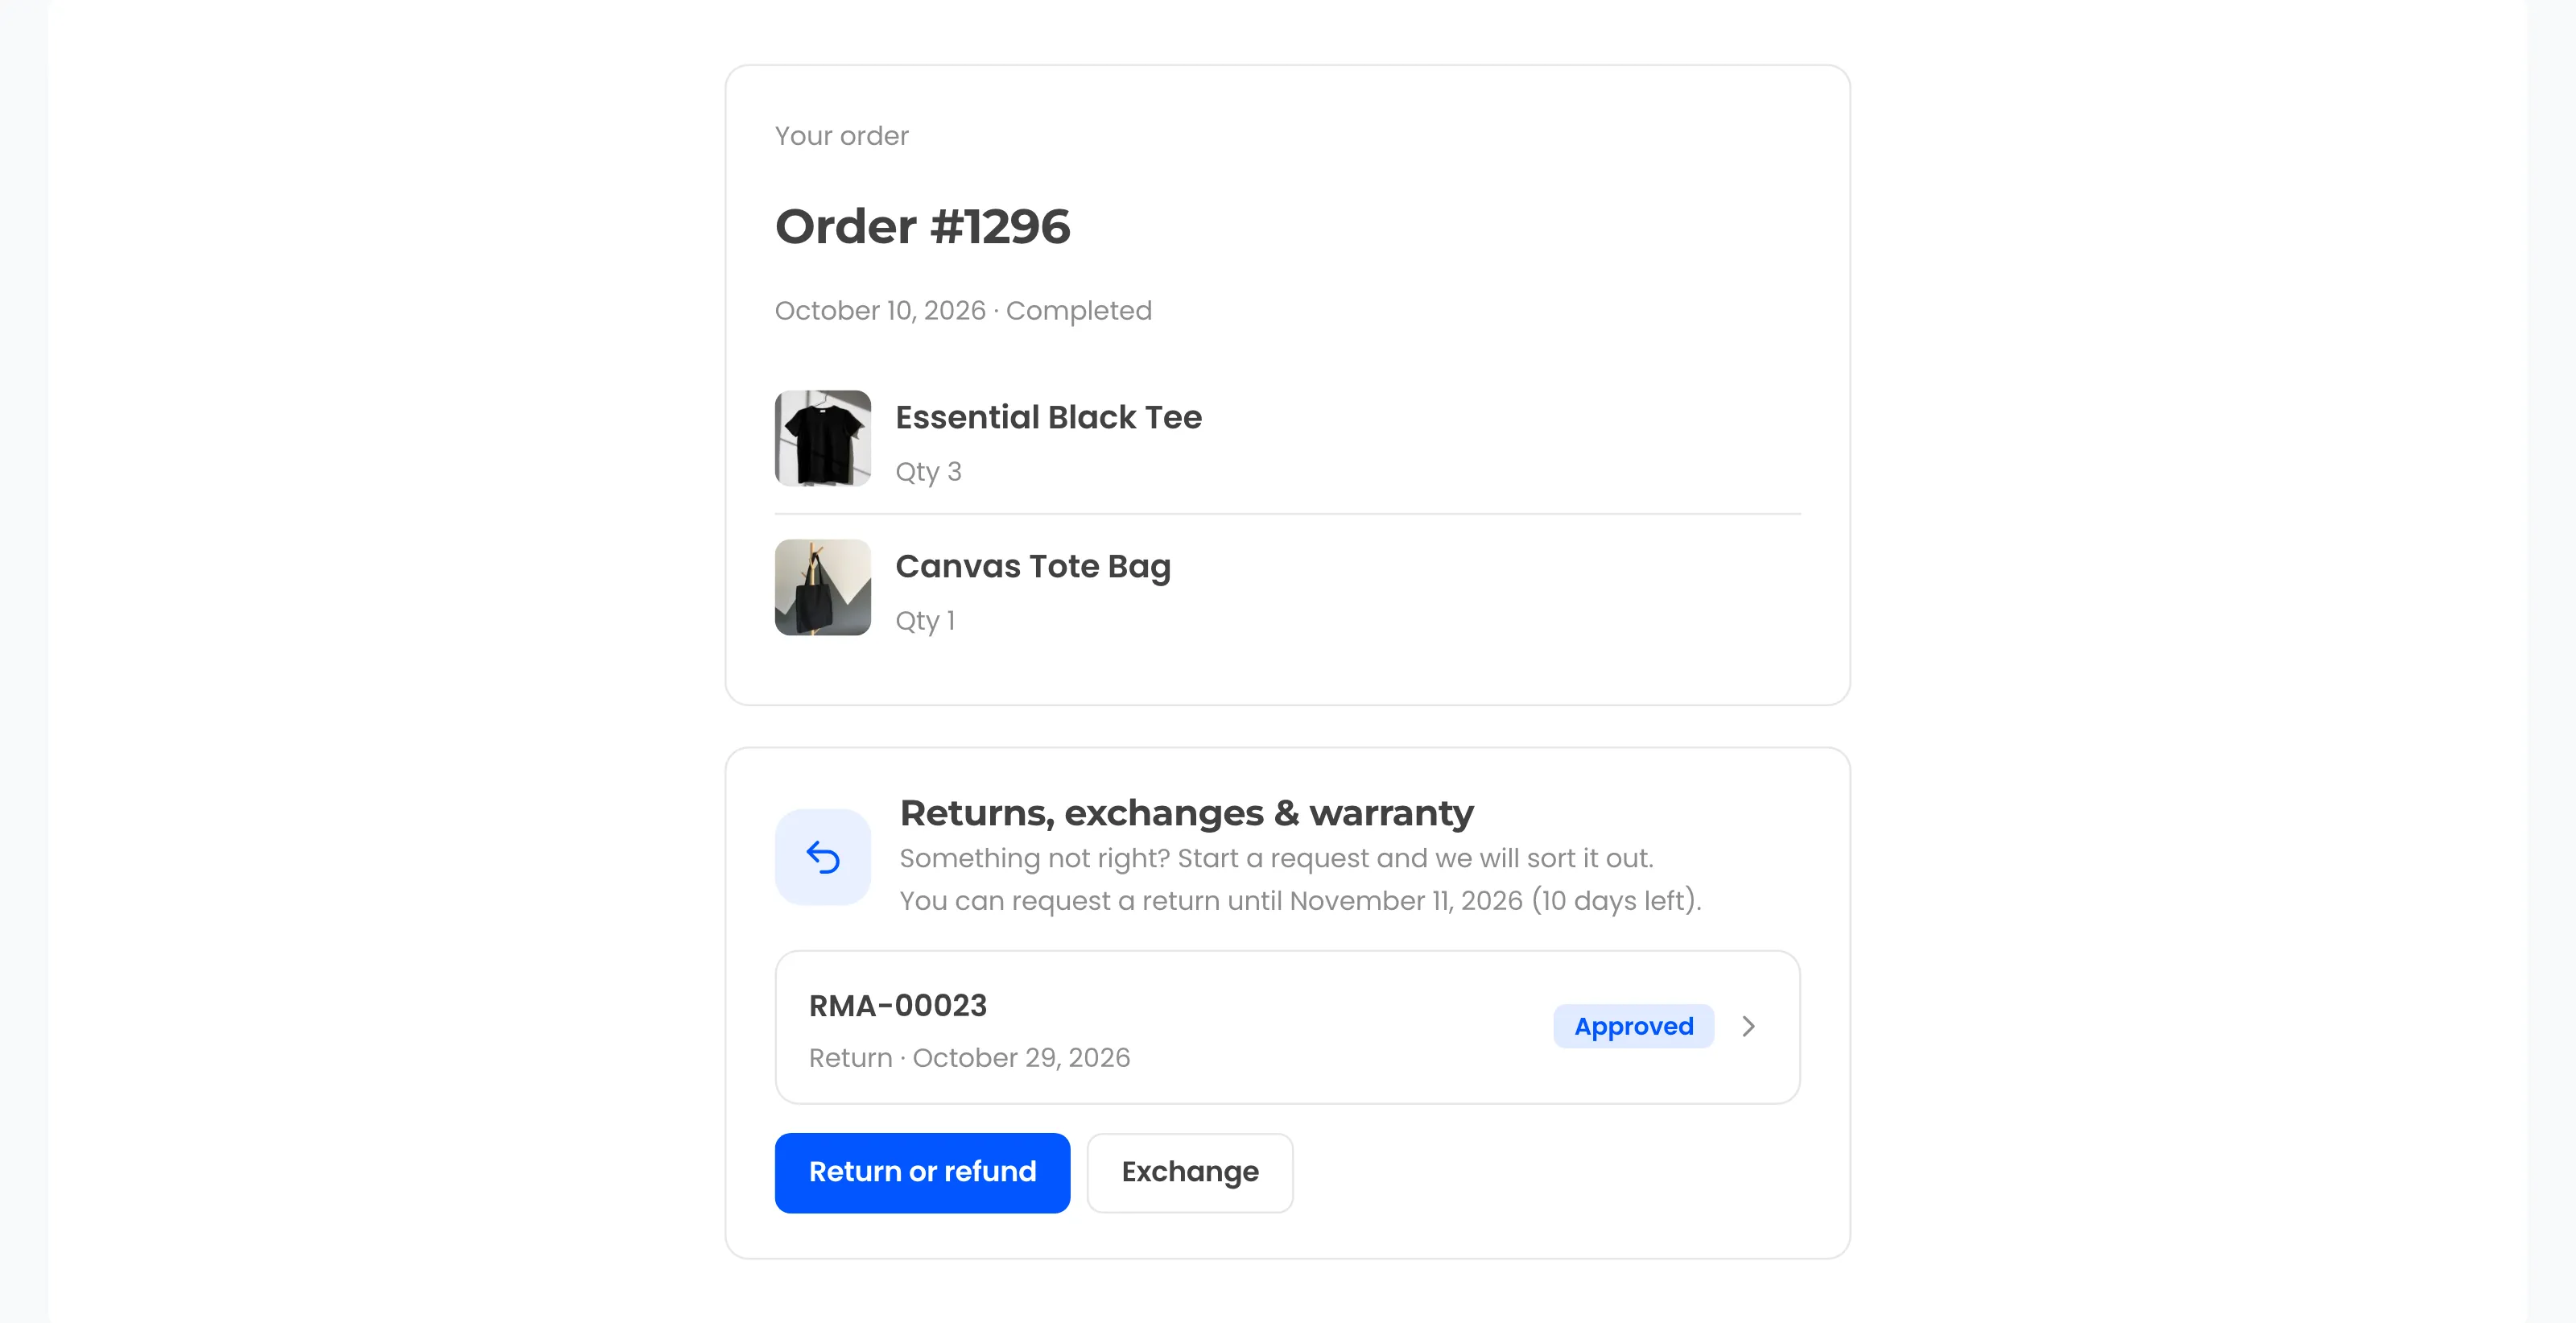
WooCommerce guest returns work through a lookup form that asks for the order number and the billing email used at checkout. When both match one order, the guest sees its items and the same return buttons My Account shows. The guest then follows the request through a private link sent by email.
The portal page holds the [ddwcwr_returns_portal] shortcode. On block-built pages use the Returns portal block instead, and both render the same form. The shortcodes and blocks docs list both options.
Guest returns portal after Find my order
A guest lookup form is an obvious target for guessing order numbers. WPReturns limits lookups per visitor per hour with “Attempts per hour” on the EU Withdrawal tab. The default is 5, which covers honest typos and stops a script.
After a match, the order opens through a signed link that expires after two hours. Each request also gets its own secret key. Email links open the request page with it and need no password.
Tip: Exclude the portal page from full-page caching. A cached copy carries an old security token, and guests then see “Your session expired” when they search.
How Partial Returns and Item Condition Work
Partial returns let a customer send back some items, or some units of one item, from a single order. The return form lists every line with a checkbox, a quantity picker, a reason and a condition. The refund then covers only what was requested, and the rest of the order stays as it was.
Customers reach the form from the order itself. Each order that qualifies shows its deadline in a line such as “You can request a return until November 7, 2026 (6 days left).”
My Account > Orders > View order
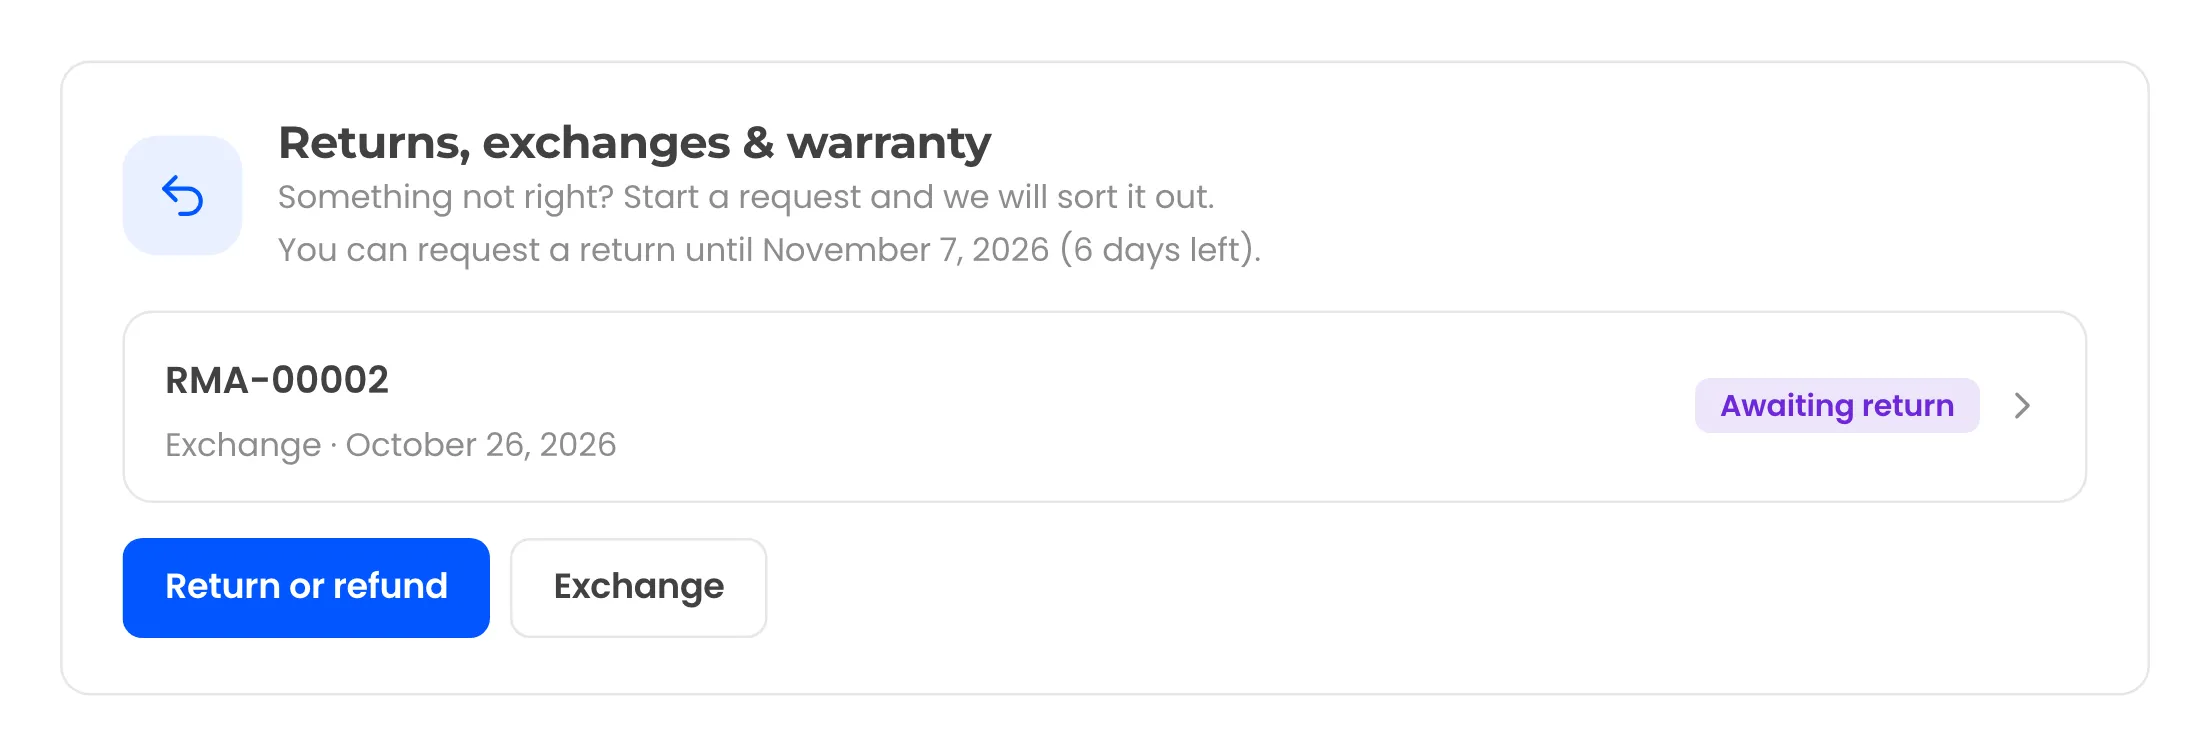
The free plugin labels the button “Request a return”, and Pro labels it “Return or refund”. Both open the same form.
Return form > Which items?
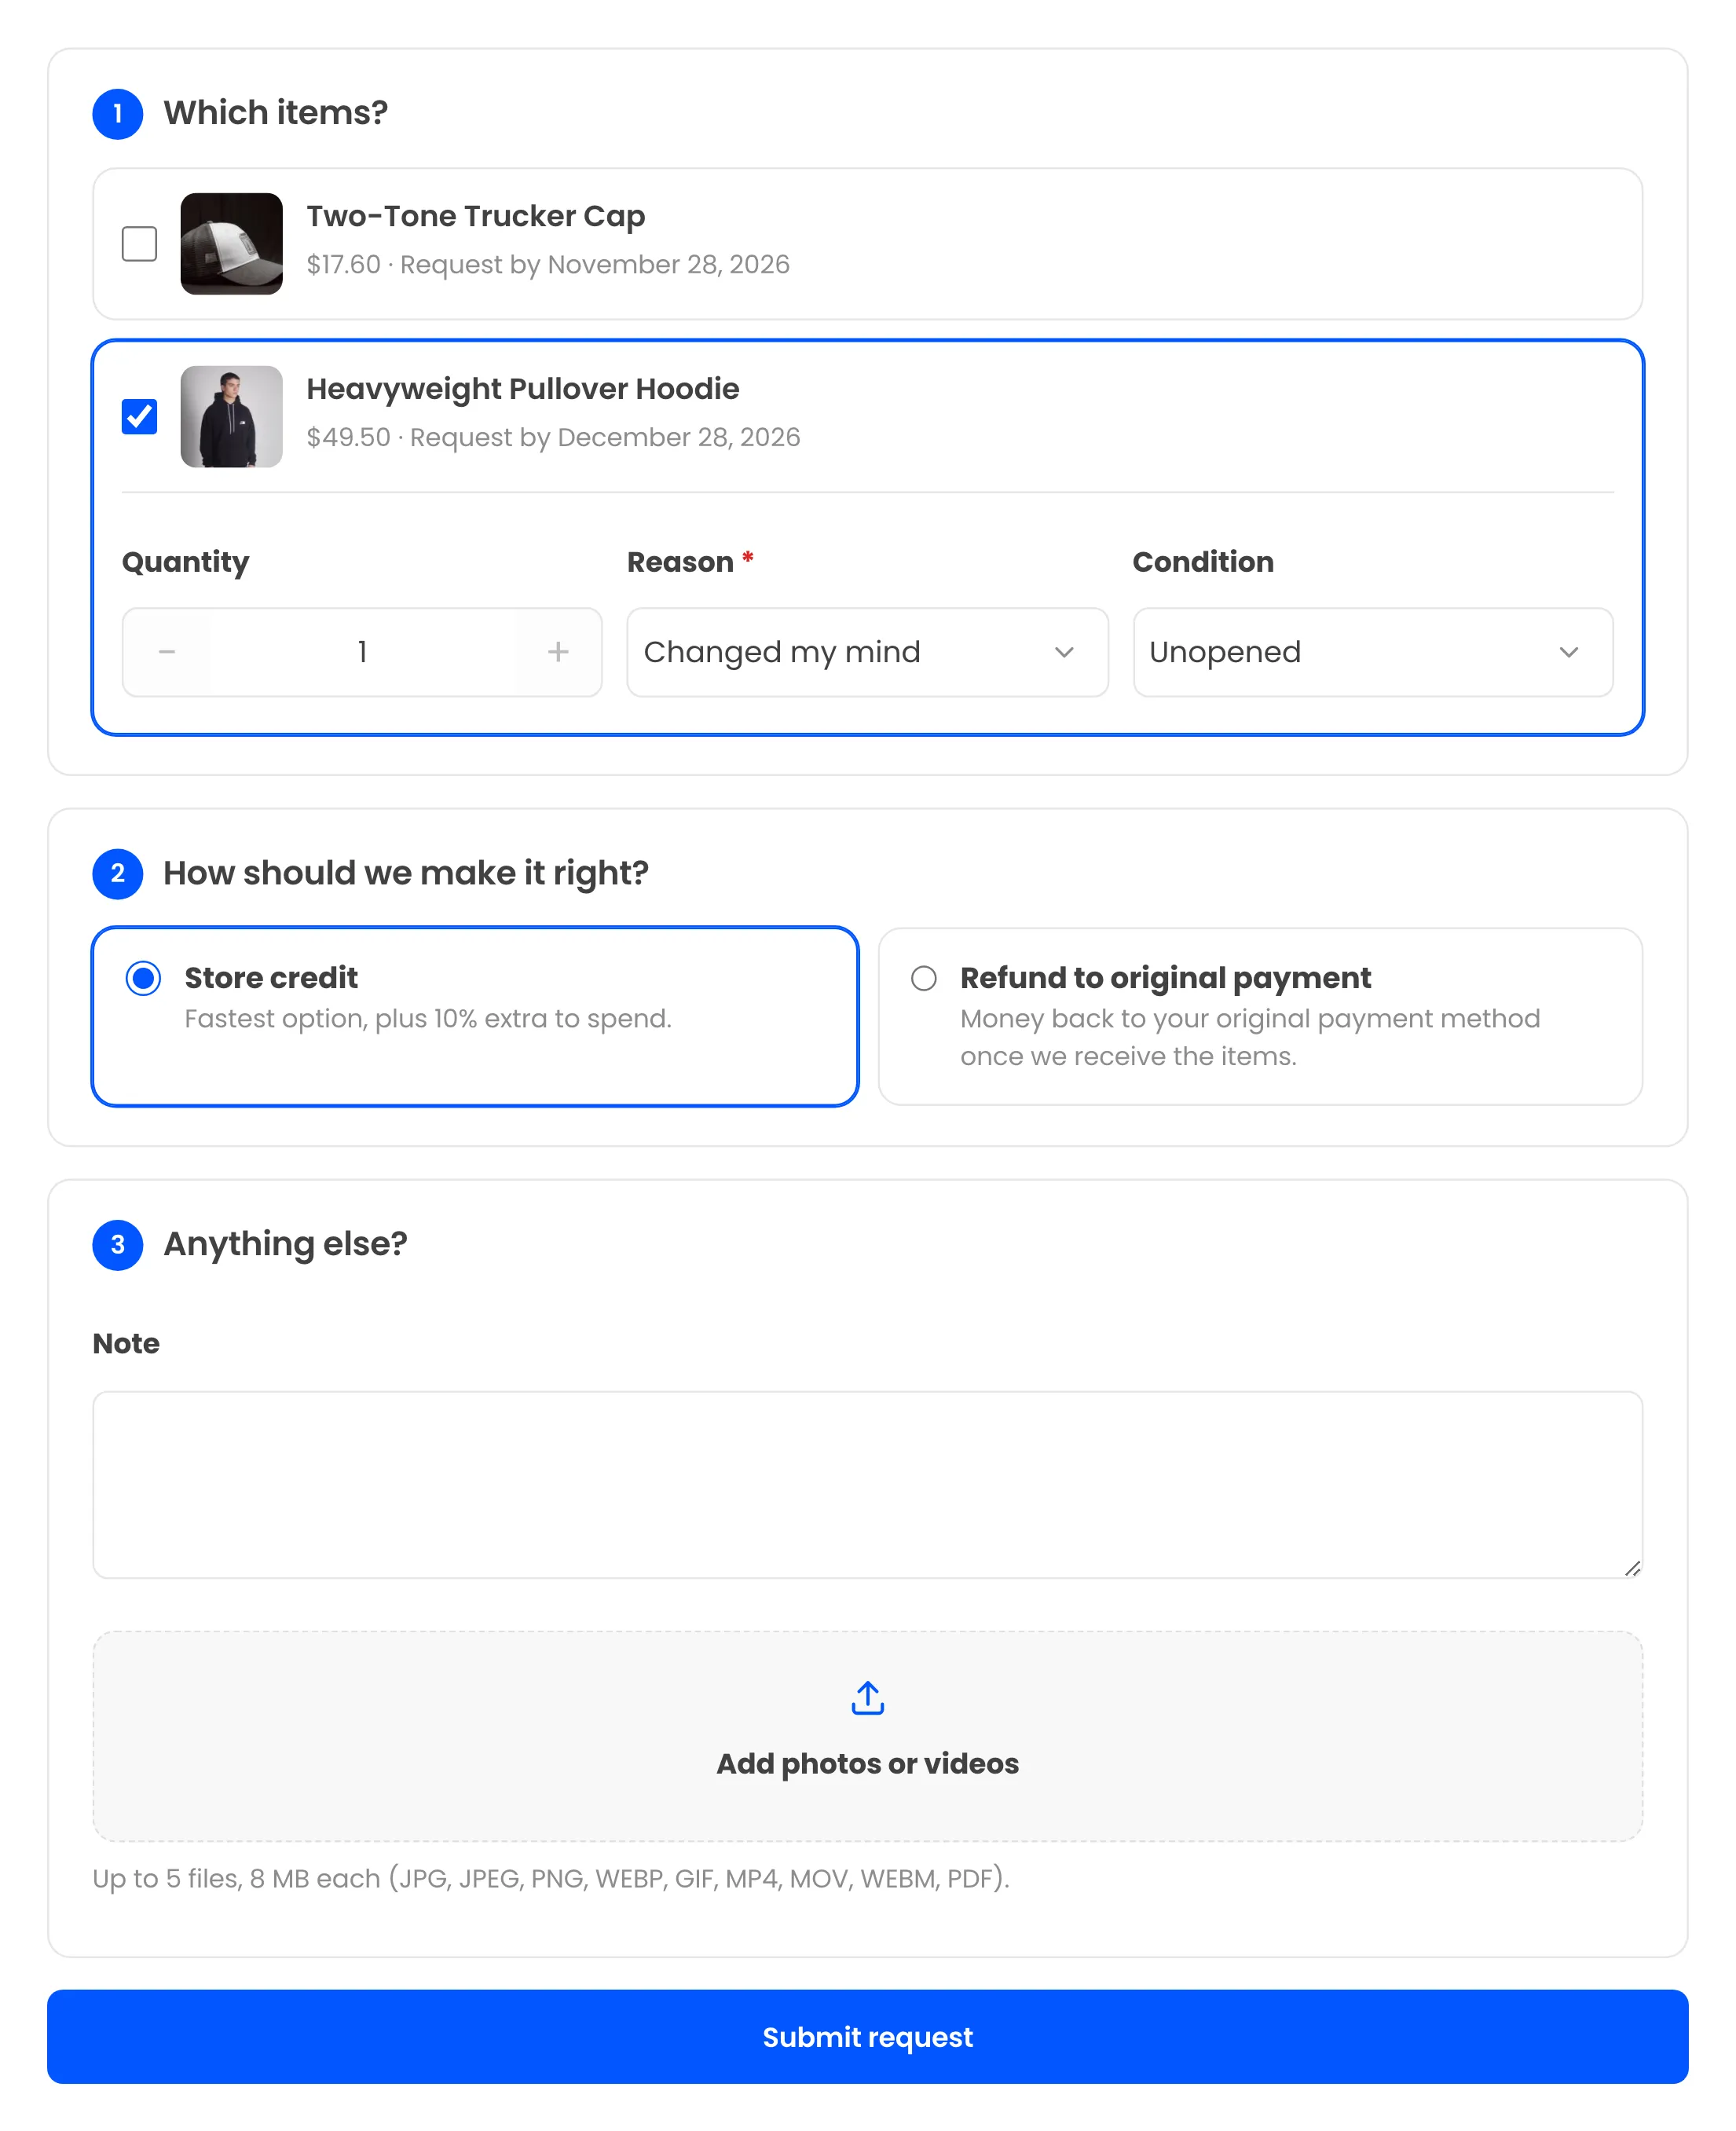
Each item gets one of five conditions, from “Unopened” and “Used or worn” to Damaged or Defective. That choice feeds the restock step later. When you mark a return received, items go back in stock except damaged and defective ones.
Say a customer bought three shirts at $25 each and returns one in the wrong size. The request holds one shirt with the reason “Wrong size or fit”. The refund is $25 and one shirt goes back into stock (example figures).
How Return Photos Stay Private
Return photos and videos go to a private folder inside uploads with random file names, and they never appear in the media library. Only the customer, anyone with the private request link and your shop team can open them. The defaults allow 5 files of up to 8 MB each.
Allowed types are jpg, jpeg, png, webp, gif, mp4, mov, webm and pdf. Your server’s upload limit still applies on top of the plugin’s limit.
On Apache the plugin blocks the folder with .htaccess. On nginx, add this rule so nobody can open the folder directly:
location ~ /ddwcwr-private- { deny all; }The private uploads docs explain the filter for moving the folder somewhere else.
What Your Team Does With a Return Request
Your team handles each return from a single request screen with a next-step card at the top. The card tells staff what to do now: review, wait for the parcel or resolve. Every step emails the customer, and the customer’s request page updates with it.
A return moves through five stages, from request to refund:
The Return Lifecycle in WPReturns
- 1RequestCustomer picks items and a reasonEmail to both sides
- 2ReviewStaff approve or rejectEmail to customer
- 3Ship backLabel uploaded and tracking addedLabel ready email
- 4ReceiveParcel checked and restockedStatus email
- 5RefundPaid through WooCommerceResolution email
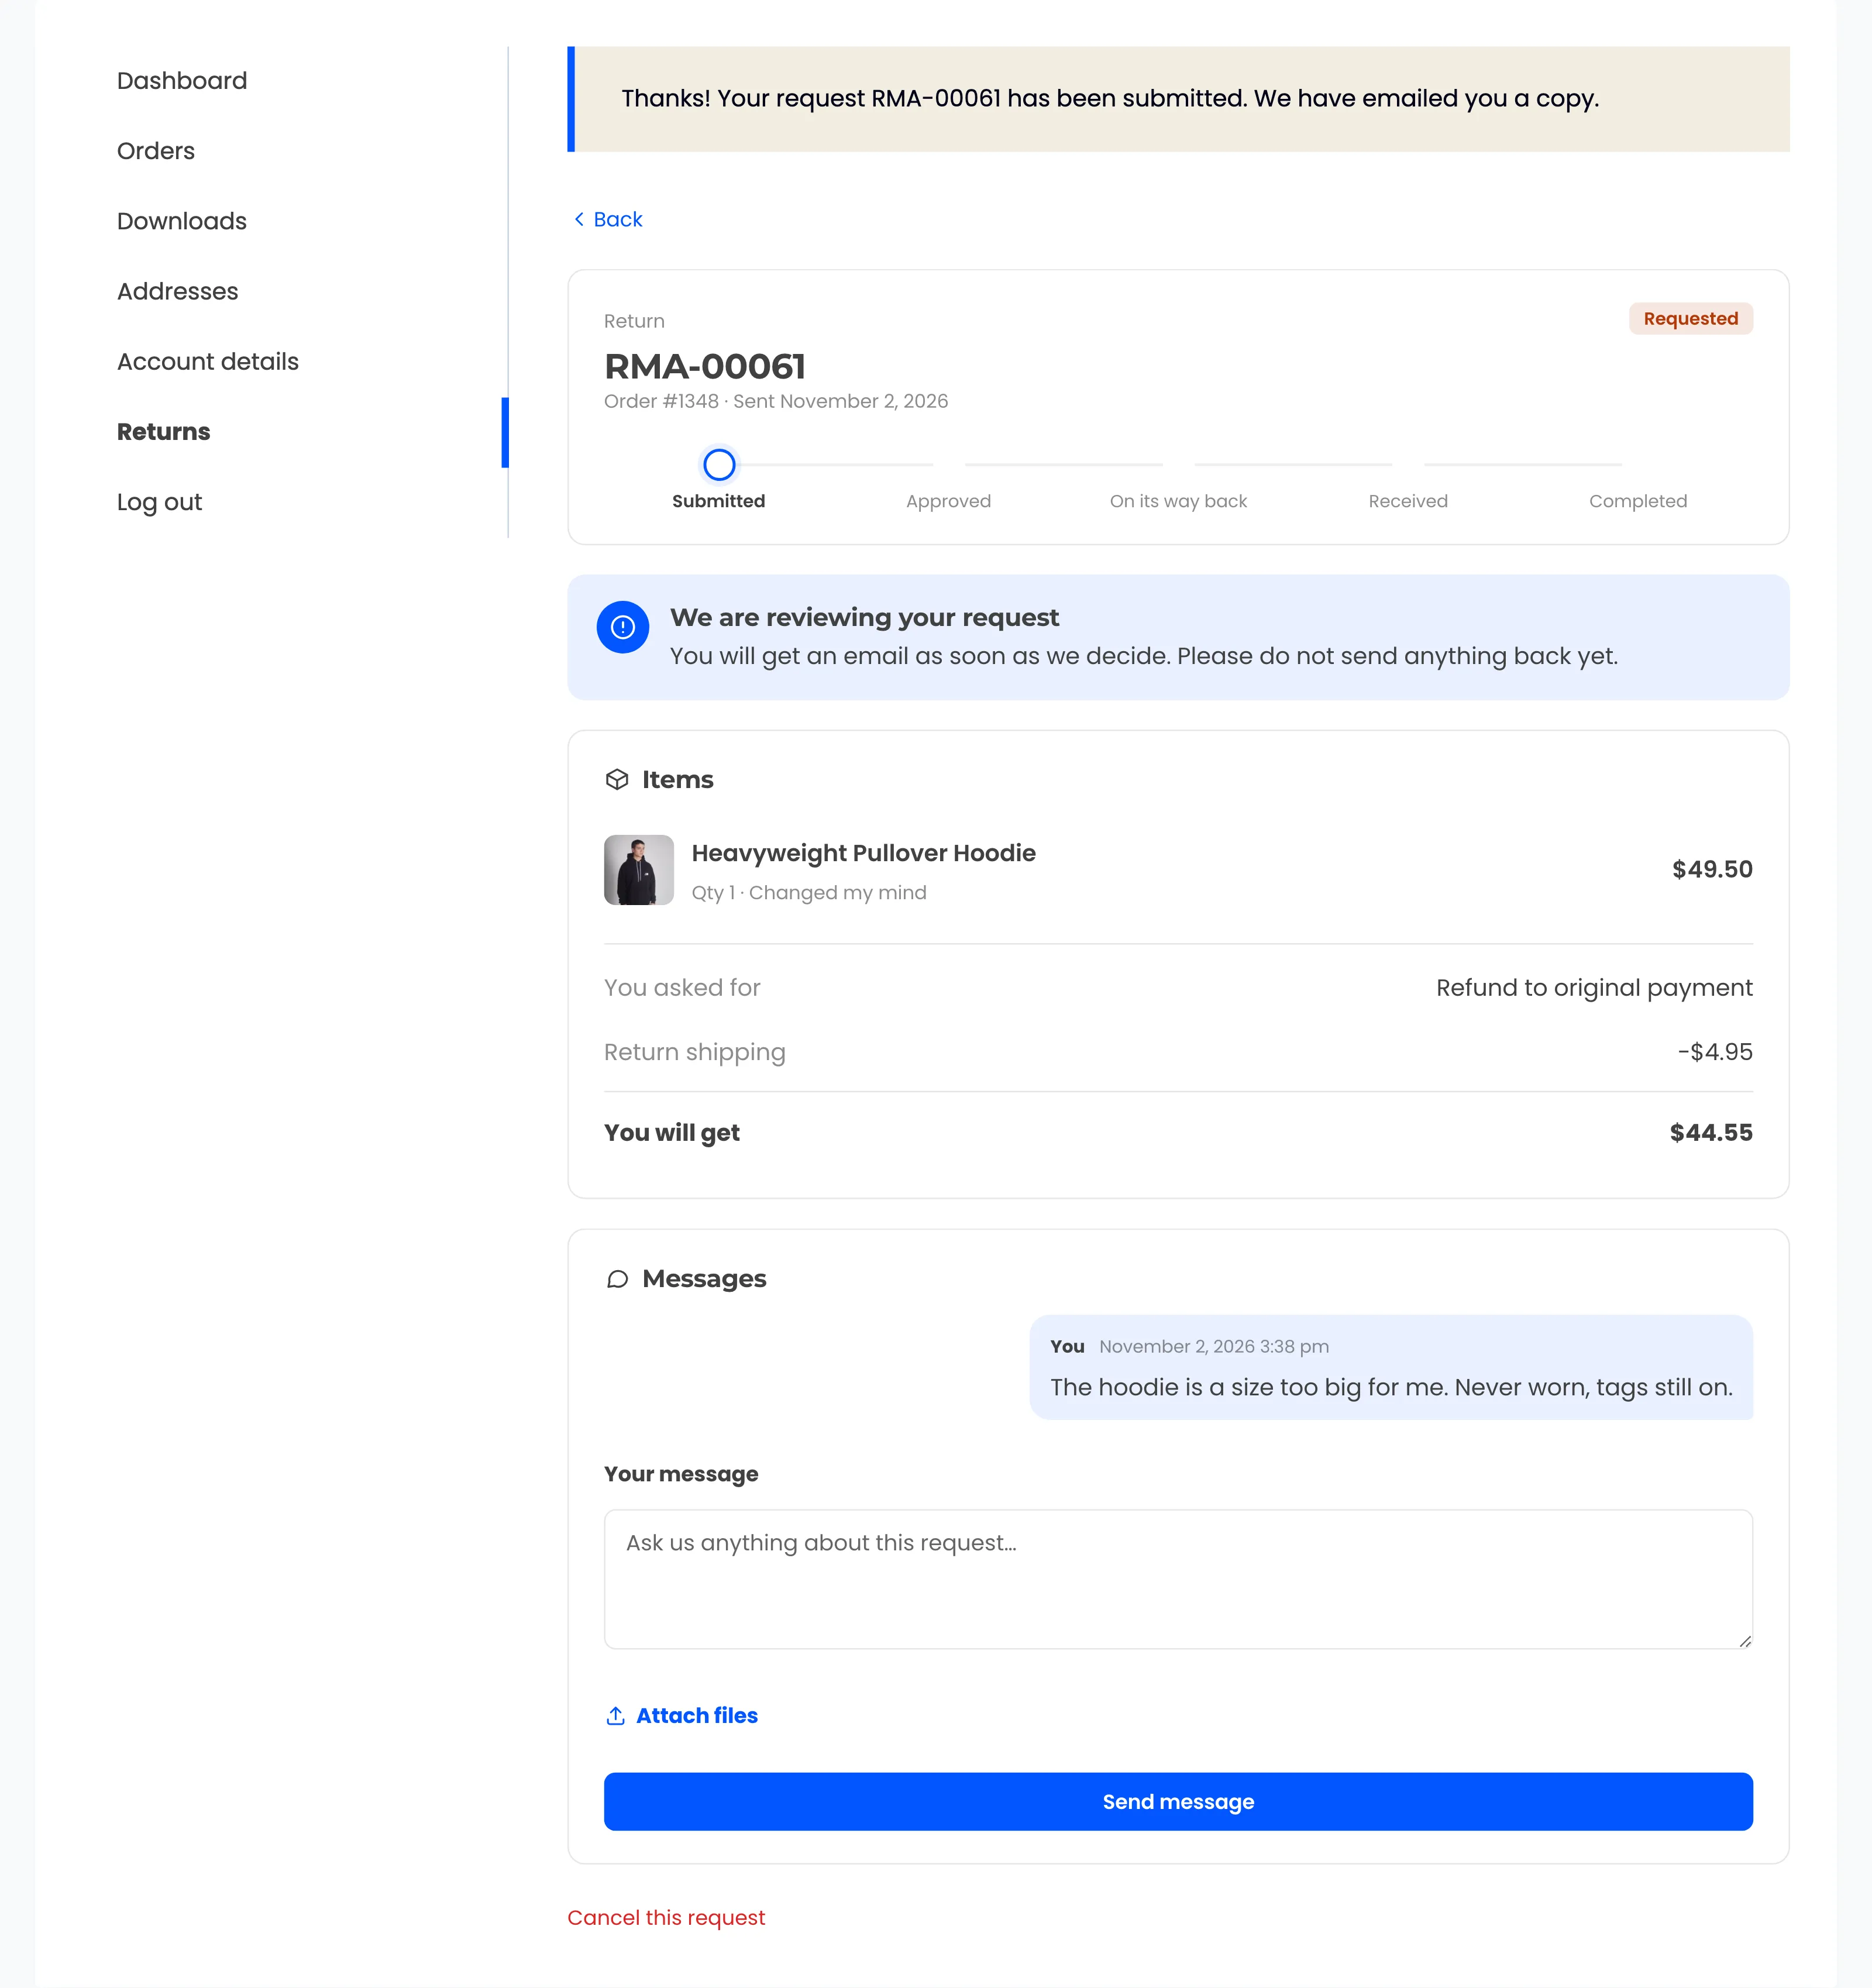
Right after submitting, the customer lands on a request page with a progress tracker and the line “We are reviewing your request”. The Items card already shows what they will get back.
My Account > Returns > RMA-00061
On your side, the “Review the request” card holds a message box with Approve and Reject. The Items card shows the reason, condition and any photos, and the Conversation card keeps every message.
WPReturns > Requests > RMA-00001
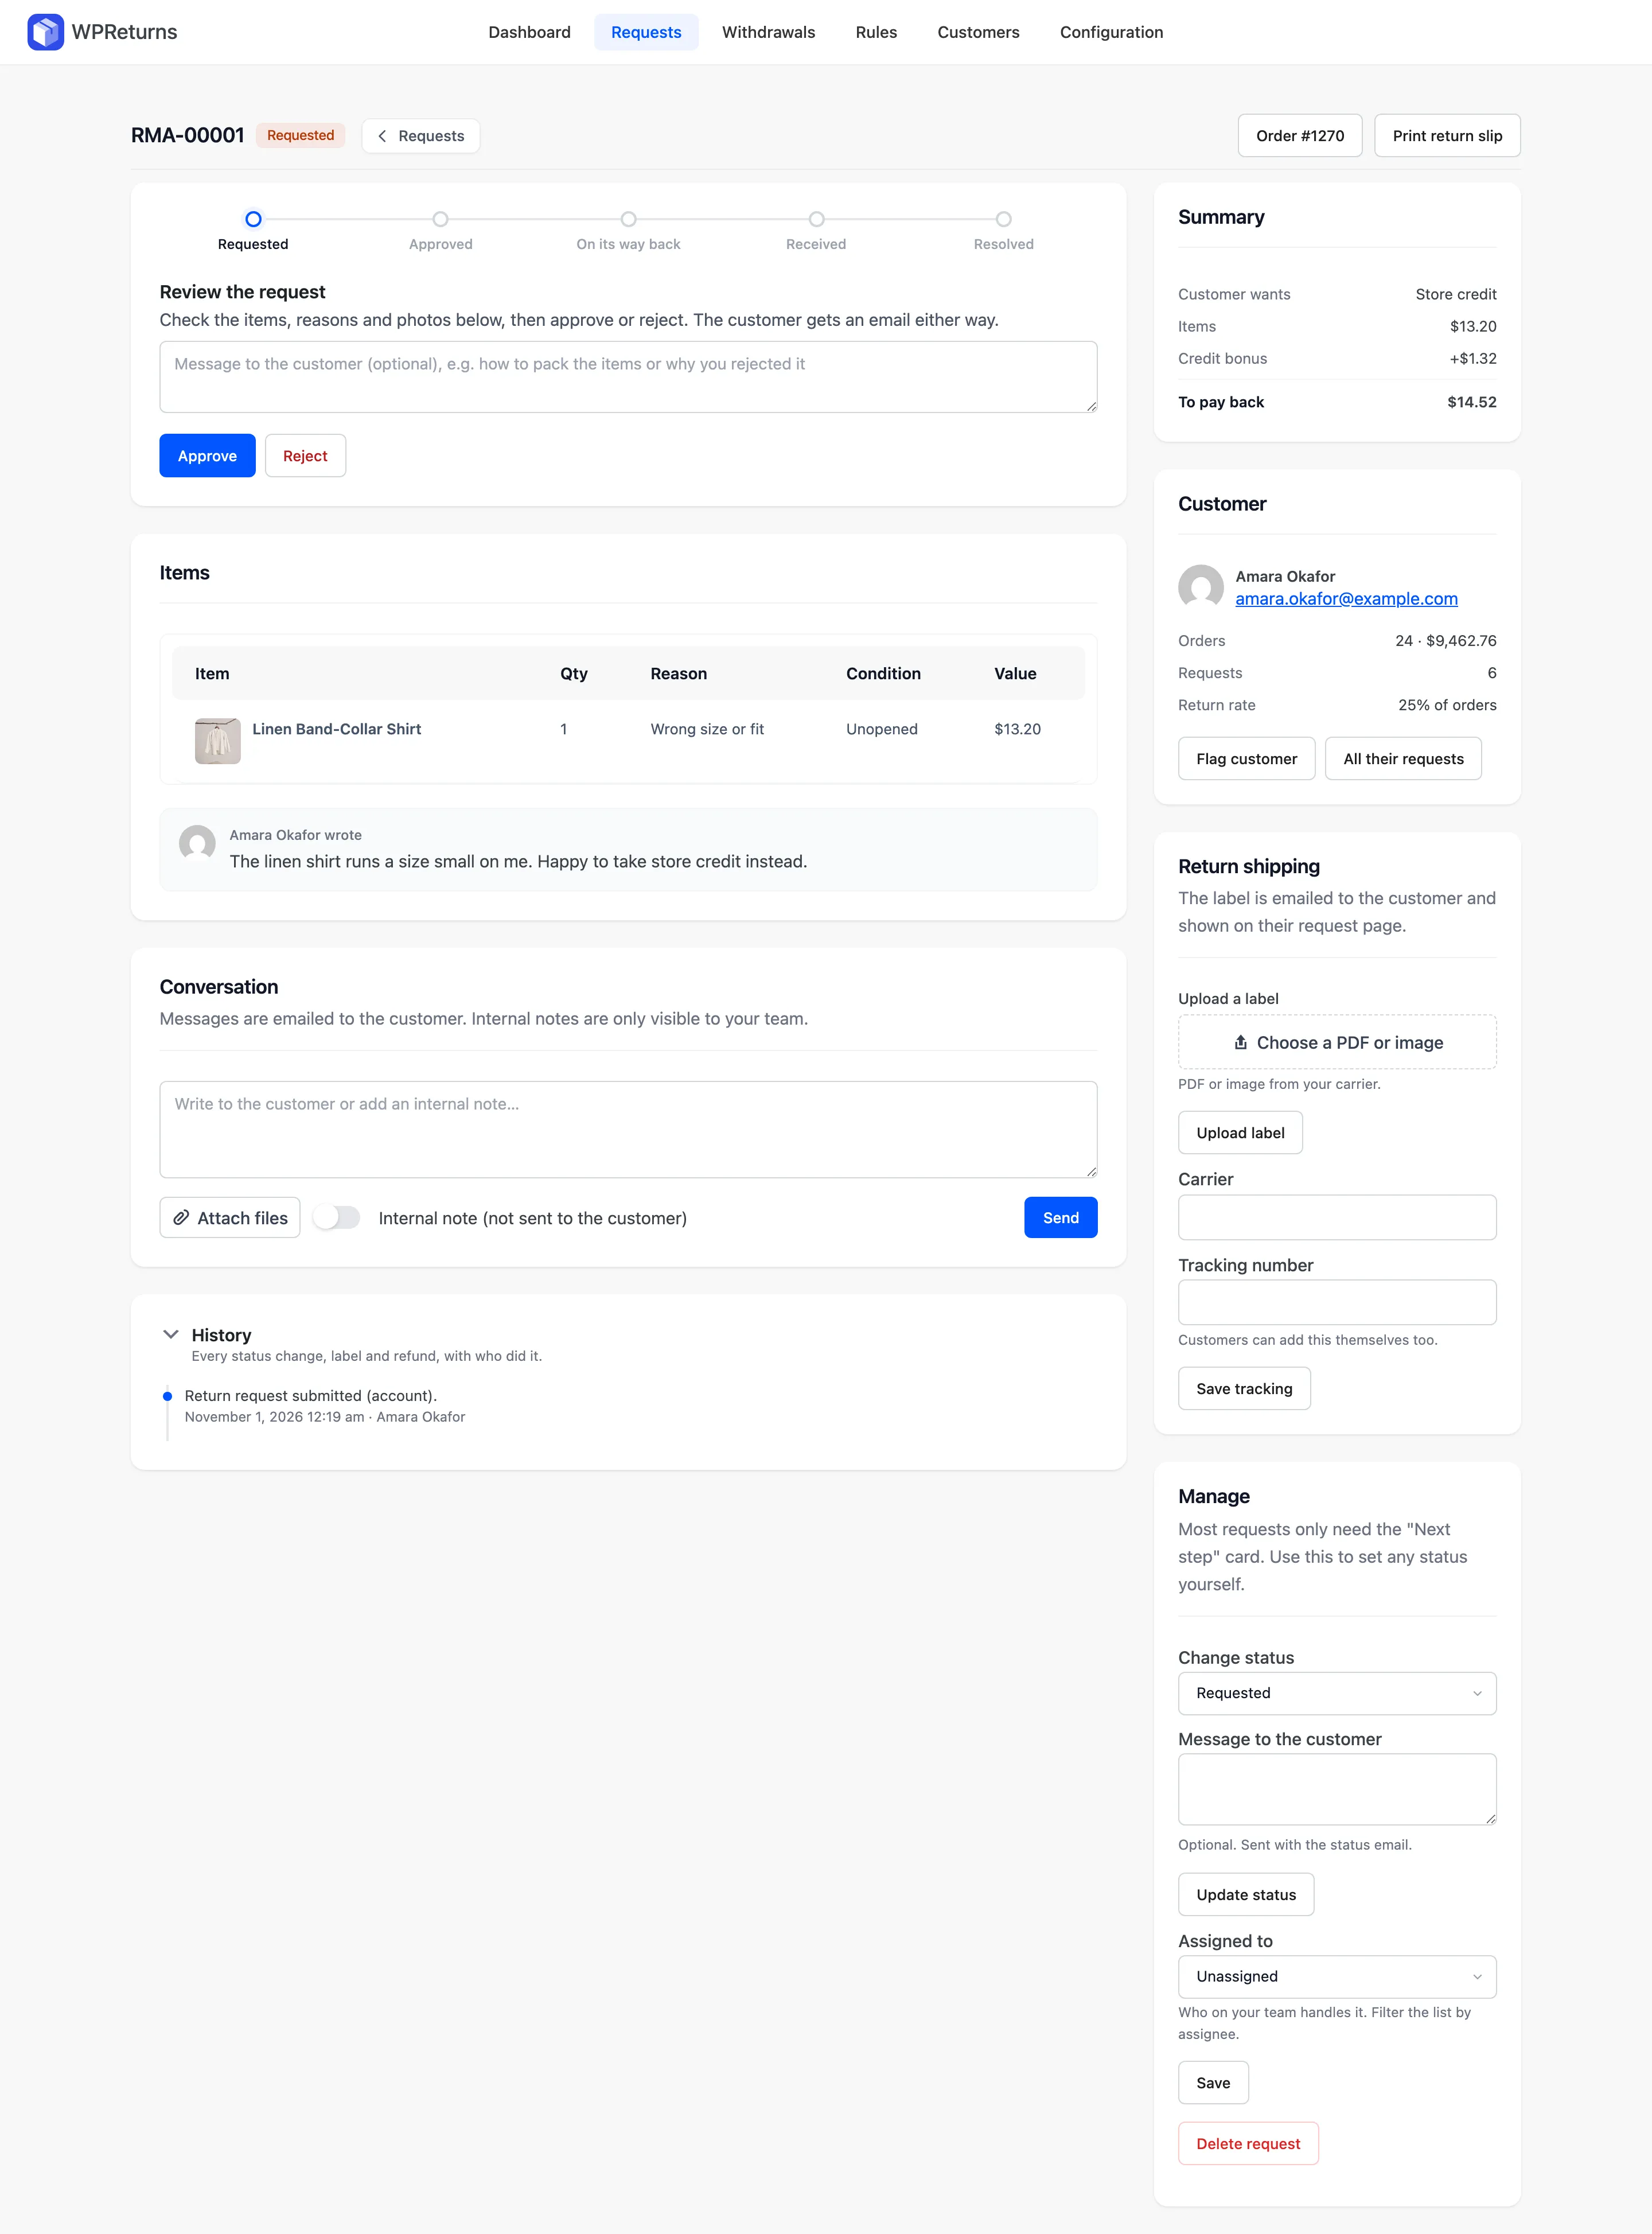
Upload a return label from any carrier, or let the customer ship it themselves and add tracking. Refunds go to the original gateway, or you record a manual refund when the gateway cannot refund. The request screen docs walk through each button.
How to Test the Returns Portal Before Launch
Test the returns portal with two orders before you link it anywhere. Run one as a guest and one as a logged-in customer. A clean test ends with a refund on the order, the item back in stock and an email for every step.
Run these checks:
- Open the portal in a private window. Use a real order number with the wrong email and confirm the lookup refuses it.
- Return one unit of a two-item order with a photo attached. Check the request screen shows the right quantity and the photo.
- Open the return form on an order holding a final-sale product. The product should show as not returnable.
- Run the full loop: approve, upload a label, mark received with restock and refund. Check the stock level and the customer emails after each step.
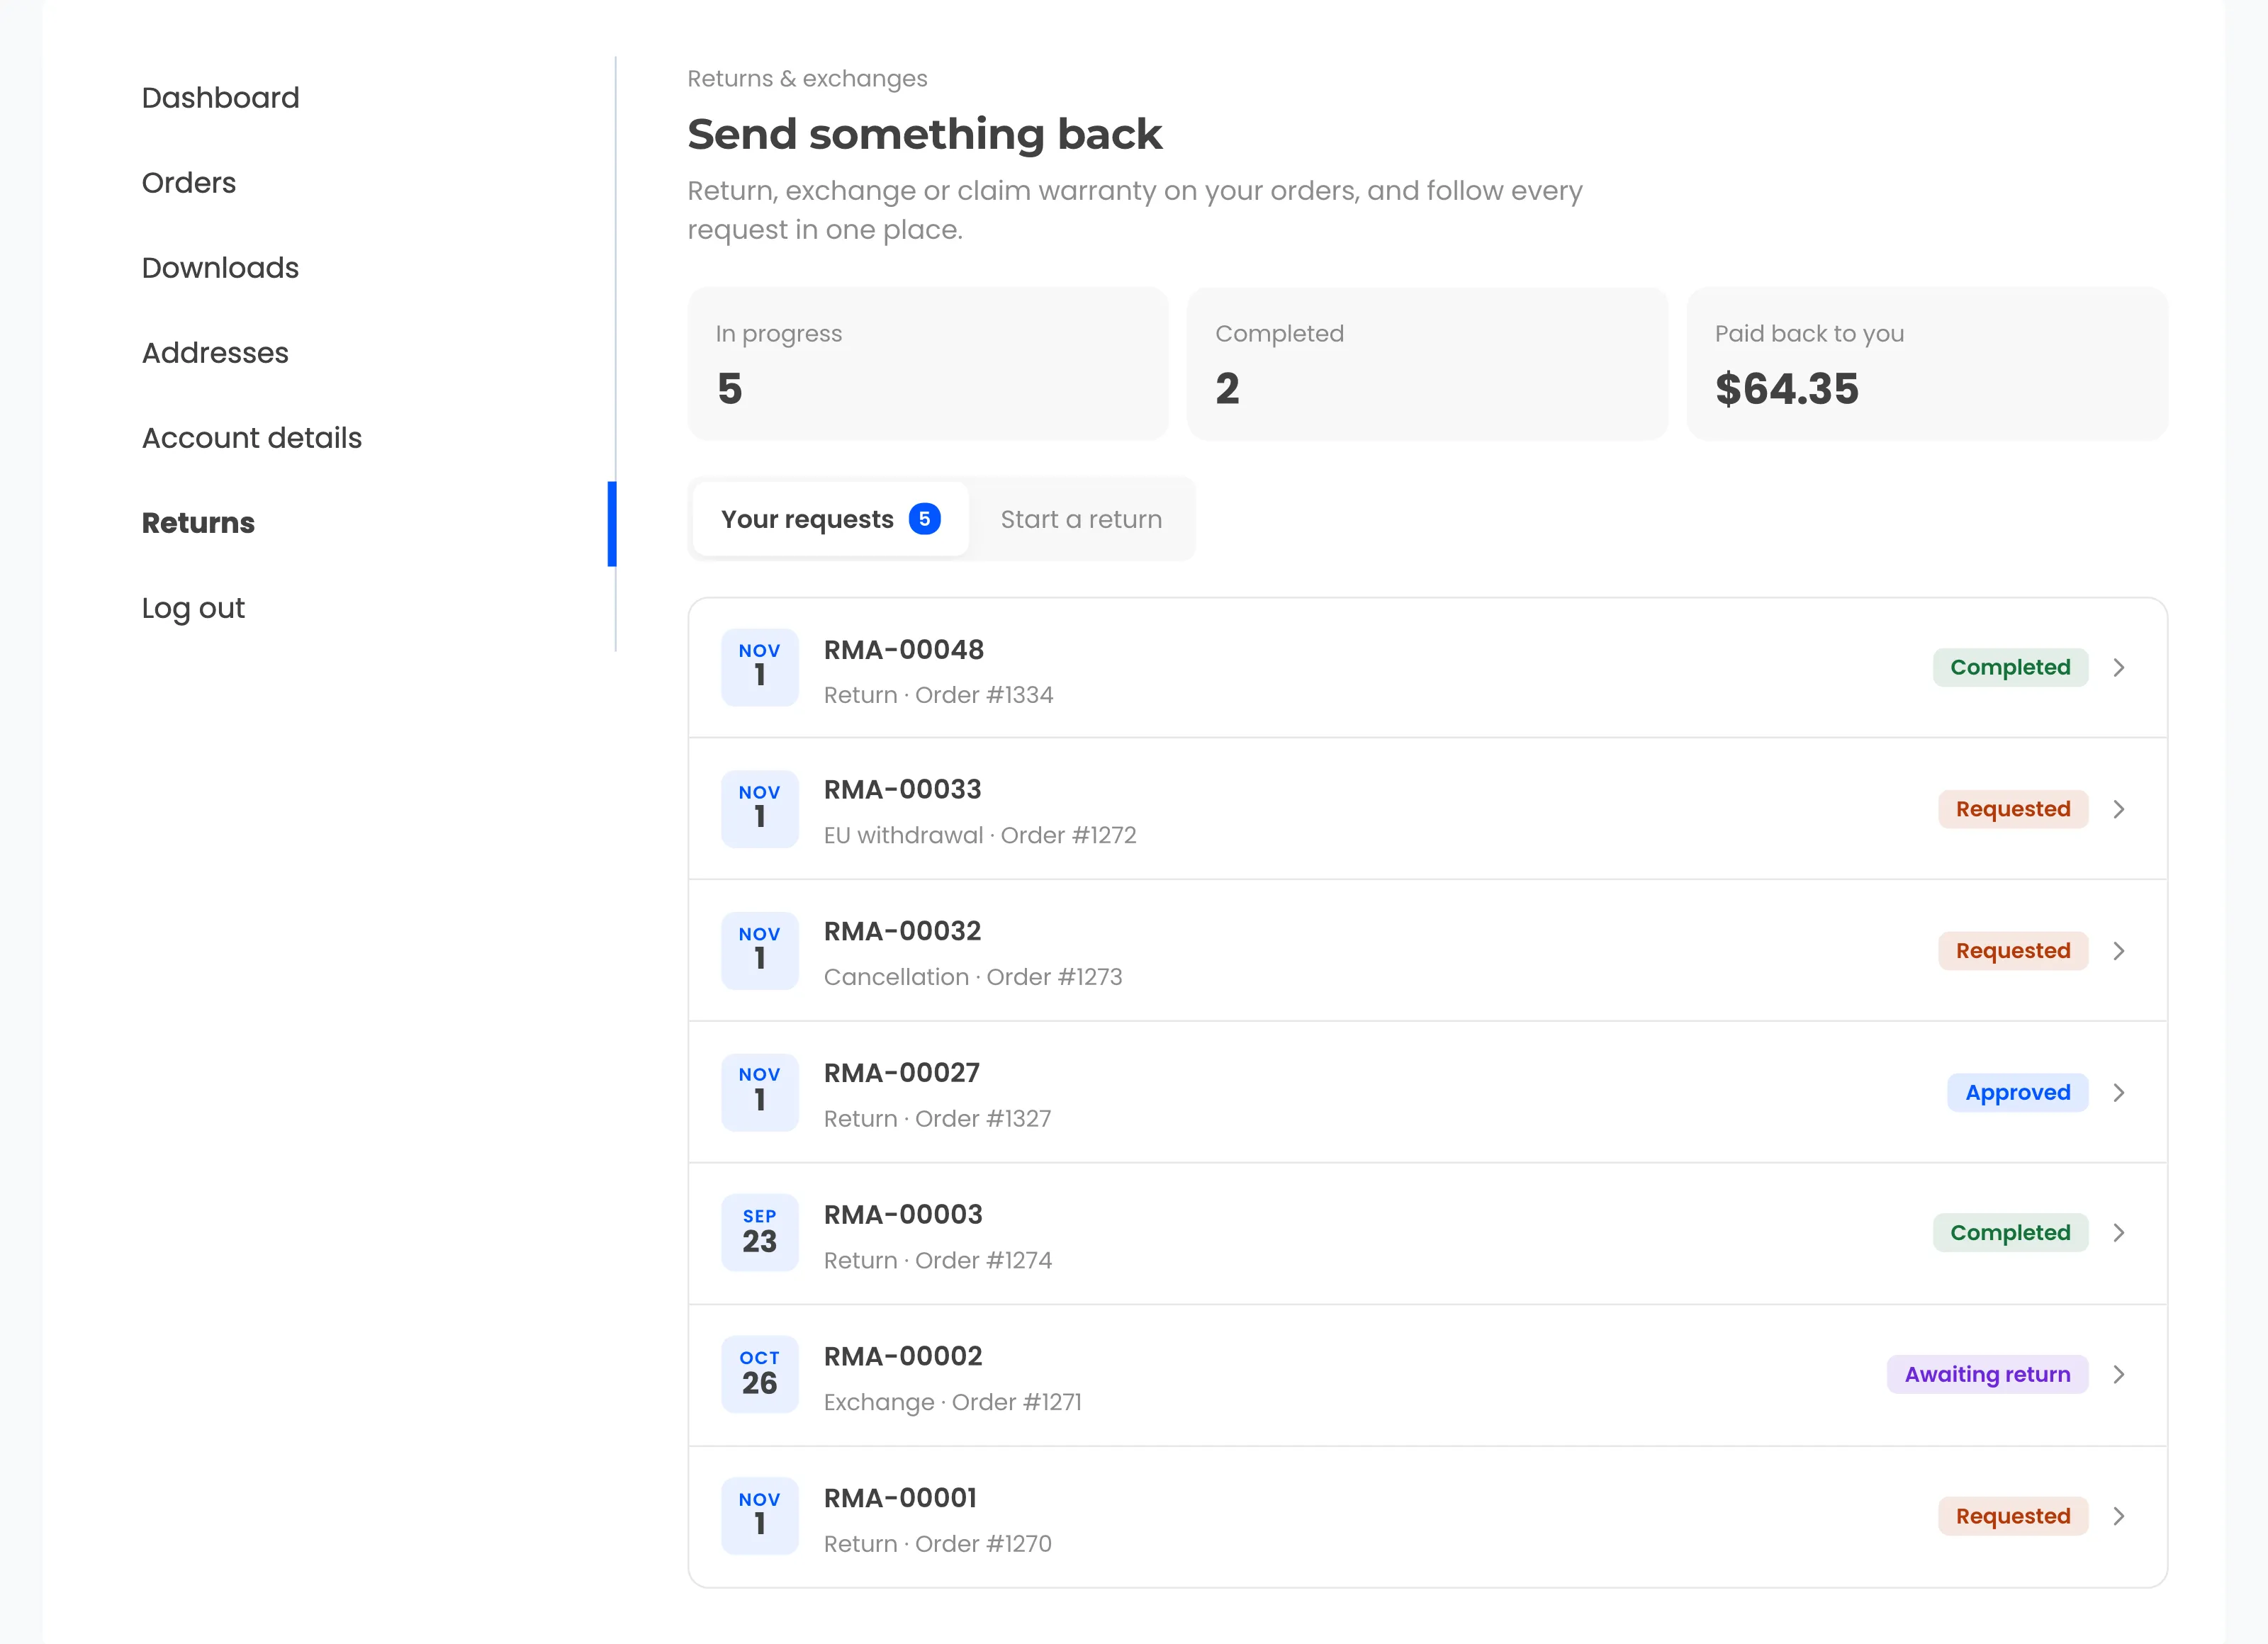
The logged-in customer’s results land on My Account > Returns. It lists every request with its status, plus tiles for requests in progress and money paid back.
My Account > Returns
Note: If an email does not arrive, check WooCommerce > Settings > Emails first. Every WPReturns email is a WooCommerce email that uses your normal mailer and templates.
Free Returns Portal Compared With Other Plugins
The free WPReturns plugin includes the guest returns portal, partial returns with quantities and photo uploads. Two of the most installed free returns plugins keep some of those for their paid tier. Both have a longer public track record than WPReturns, which came out in October 2026.
We build WPReturns. That is why the table also shows the rows where the other two lead.
| Feature | WPReturns free | WP Swings RMA free | WP Desk Flexible Refund free |
|---|---|---|---|
| Guest returns portal | Yes | Paid tier | Paid tier |
| Partial returns with quantities | Yes | Paid tier | Paid tier |
| Photo and video uploads | Yes | Yes | Paid tier |
| Active installs | New in 2026 | 4,000+ | 2,000+ |
| Reviews on WordPress.org | None yet | 4.7 from 124 | 4.0 from 4 |
Compared on October 30, 2026, from each plugin’s own listing, with installs and reviews re-checked on November 2. WP Swings has the longest public track record of the three.
The free plugin has a limit worth knowing. It applies one return window to the whole store, so a longer window for one category needs Pro’s return rules.
Pro also adds exchanges, store credit and prepaid labels. The free vs Pro page lists every difference, and Pro starts at $99 a year for one site.
Conclusion
Now you know how to set up a WooCommerce returns portal in seven steps, from installing the plugin to linking the portal page. The free WPReturns plugin covers guests, partial returns, photos, final-sale items and refunds through WooCommerce.
Set the window and reasons to match your written policy. Keep “Photo required” on only where a picture decides the outcome, then run the four test checks before you link the portal from your menu.
The My Account returns docs cover the logged-in side in more detail.